Wow, I have learned sooo much about what you enjoy reading/viewing when you visit BNOTP. Thanks so much to the 400+ readers who have already completed the short 9 question survey I posted HERE. And thank you from the bottom of my heart for the unbelievably generous comments you've shared. I found myself almost in tears at times while reading your comments. Please know how much I appreciate your responses and that you took time to share your preferences with me. If you haven't yet taken the brief survey, there is still time. I'll leave it open through Monday evening. Thanks again for your input!
Carved Watermelon Party Centerpiece:
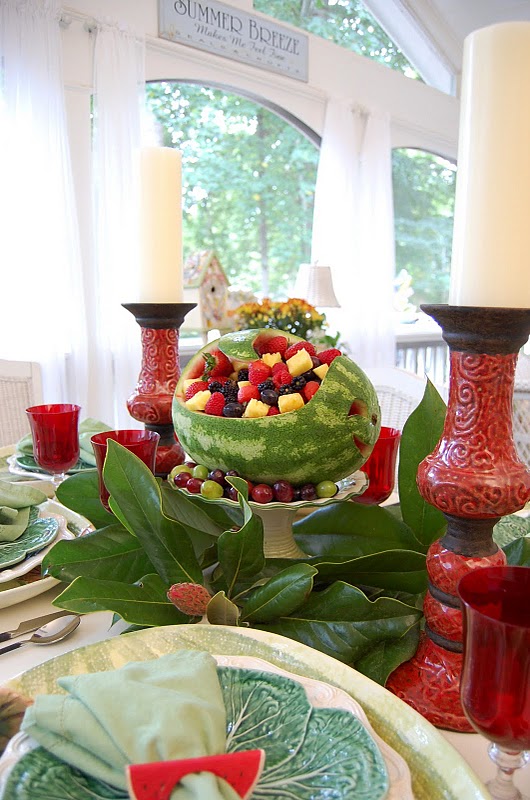
This past Tablescape Thursday, I shared a table setting with a carved watermelon centerpiece.

For a party many years ago, I cut the top off a watermelon and hollowed it out to hold fruit. That was cute, but I've always wanted to try my hand at carving one into a fun shape.

The cookbook below provided the inspiration I needed for this centerpiece. I've had this cookbook for many, many years and I've always admired the carved watermelon on the front. I've carved designs in pumpkins as shown in THIS post where I managed a reenactment of the burglars sliding on the ice-covered stairs in the movie, Home Alone. ;)
Pumpkins can be a bit hard to carve unless you have special carving tools (also shared in that post.) I'm happy to report, carving a watermelon is nothing at all like carving a pumpkin. Watermelons are much softer and much easier to carve out than pumpkins.

The cookbook above provided this template for tracing out Mr. Whale's tail. You should be able to save it to your computer by right clicking on the pic and choosing save. Then just enlarge or decrease it to the size that's appropriate for your watermelon.

Here's how my template looked once I printed and cut it out.

I purchased a small watermelon for my first carving attempt. If you're having a really large gathering, you may wish to buy a larger melon. This small one held a LOT of fruit, though...I was really surprised.
Place your melon on a flat surface. The stem is going to be the nose of your whale when you're done, so position your tail template on the opposite end of the whale, but with the tail pointing back toward the stem end. When you're done, it's going to look like Mr. Whale has flipped his tail up into the air and pointed it back toward his head/face.
I didn't use pins to hold the template in place...just held it with my hand as I traced around it. Trace the tail shape/design using a pen, crayon or whatever you have handy.

Once I had the tail traced on the top of the melon, I continued the line out, down and around the side of the pumpkin, then upward on the front to create the rise for the face/head. (Refer back to the pictures above of the completed whale to get the general idea of where to draw your lines on the sides and for the face.)
I used a crayon to draw this design and I made adjustments along the way, just wiping off the crayon marks where I didn't want them. If you like, go ahead and free-hand on the eyes and smile at this point. There wasn't a template for the eyes or for the mouth in the book, but they are easy to draw on your melon.

The directions recommend you cut an X like this into the top section of the pumpkin between the tail and the head to relieve the pressure inside the pumpkin.

Once you have your design on your melon, take a pumpkin cutting tool or just a small paring knife and began cutting around one side of the tail. Don't rush, just take your time. You can see the pumpkin cutting tool/knife I used below to get started. A small, sharp knife would work great too because melons are just so much easier to cut than pumpkins. In this view below, you can see the shape of the head as it rises upward on the front of the melon. I hadn't yet drawn on the eyes or mouth.

Next, I just began cutting out sections of the middle part that I knew would need to be removed. I was careful to avoid cutting into the tail, head or side.

You can cut the part you're removing out in small chunks or bigger pieces...whatever you feel comfortable doing.

Making progress...


With most of the middle removed, it was time to start scooping out the inside. I also trimmed down the "meat" side of the tail section until it was about an inch or so thick. I hadn't done that when this photo was taken. Be super careful when you're trimming away melon from the underside of the tail. Support the tail with your other hand and take it slowly so you don't slice too deep or take off too much.

Of course, you'll want to save the melon you scoop/cut out to make melon balls or to cut up into small pieces to put back into your melon once it's ready to be filled. Once I got Mr. Whale all scooped out, I traced on some eyes and a smiling mouth on to the front, then cut those out.
An Idea: The mouth was the hardest section to cut because I couldn't tilt the melon back...too afraid I'd break off the tail. Once you have your outline drawn on your whale...along with the face, it might be better to cut the mouth out then, before cutting the rest of the melon. That way, you could tilt it to cut. It's a bit tricky to cut the mouth once the rest of the melon is cut out.

Here's how Mr. Whale looked once carved. You can see the underside of the tail looks thinner in this pic. I had cut away more of the pumpkin by this point. See how the stem is now his nose. :)
TIP: It's okay to cut all the way through when you cut out the eyes of your whale, but when cutting the mouth, only cut a little ways into the pumpkin, not all the way through. I know it's hard to see in this pic, but I didn't cut all the way through, like I did with the eyes. The reason for this is...it keeps the juice of the fruit from leaking out onto your table once you fill Mr. Whale.

A view from above...

The directions in the cook book suggests poking a hole into the top of your whale's head and poking in some dried white flowers so it will look like Mr. Whale is spraying water up into the air. I love that idea. I didn't have any whitish flowers to use or I definitely would have done that. You can see how it would look on the cover of the book below.

Fill Mr. Whale with your favorite fruits...
And enjoy the ooohs and ahhhs of your party guests. :)

I Googled watermelon and found the National Watermelon Promotion Board. They have directions for carving so many awesome designs. Here are just few from their site:


Ha! A porcupine! This melon has the same basic face shape of our whale. Love the ragged edge around the face...those small details add so much. This design actually looks pretty easy to replicate.

Licorice makes a cute mouth and whiskers for Mr. Kitty. Notice how they only cut as deep as the white part of the melon to outline the kitties face. The white of the melon makes a great outlining for features. Love the melon ball eyes. They even included a ball of yarn and a collar for kitty. :) Cute!

Wouldn't this be a fun centerpiece for a beach house party? All the directions for these designs are available at the site linked above in this post. I'll definitely be trying my hand at some of these fun designs next summer.

See you Sunday evening for Metamorphosis Monday!
Templates for pumpkin carving can be found HERE.
No comments:
Post a Comment