French Bleu Vintage Giveaway:
The Shopping Spree giveaway from French Bleu Vintage is still underway. Click HERE to leave your comment to be entered.
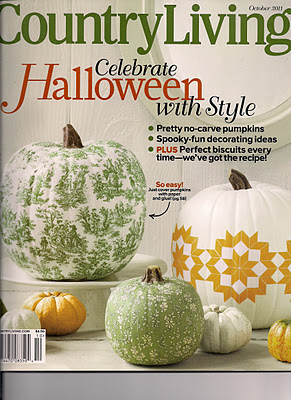
A couple of weeks ago I posted about these wonderful découpaged pumpkins I found in the October issue of Country Living.
That post (HERE) also contained a little tutorial showing how you could découpage a "craft" pumpkin.

You may remember the pattern I chose for my pumpkin was the floral fabric on this cute pillow.

Here's how it looked when finished. I had so much fun with this one, I really wanted to découpage at least one more pumpkin before Halloween was all gone for another year.

I chose a fabric pattern from the guest room this time.

Can you guess which one?

I am slightly obsessed with blue and white. It's just such a crisp, sharp combination. I love the book, A Passion for Blue and White

For my pumpkin this time, I decided on this Ralph Lauren fabric pattern called, Porcelain. It's the fabric found in the pillow shams on the guest bed.

I drove back over to the same Office Depot and ran off some copies of one of the shams. Again, I only used around 6-8 sheets.

Next, I painted the orange craft pumpkin, white. I didn't want to take any chances on that bright orange showing through the white sections of the paper. It took two coats of white acrylic paint to cover it fairly well. I used the same white paint I previously used when I made/painted a patriotic flag for the porch, HERE.

The lighting in the guest room is always a bit tough for photographs since it's on the north side of the house.

So, I took Mrs. Pumpkin out on the porch for a few natural-light photos. You can really see the true colors out here on the porch.

I really love how it turned out. The central design that appears several times on the shams is visible in this photo. It depicts two exotic-looking birdies up in a tree. I put that pattern on the front and back side of my pumpkin.

Then I just filled in the rest of the pumpkin with the other parts of the design. This pumpkin definitely took longer than the one I posted about before. It was tricky matching up this intricate pattern--kind of like putting together one of those puzzles where all the pieces look the same.
You'll find the previous post showing how to découpage a craft pumpkin, HERE. It's really easy. Just don't rush--take your time.

I'd still love to découpage something with the graphics from the Pictorial Webster we saw in the Country Living magazine. I don't think I want it to be a pumpkin, though. Ummm, I'll think of something.
Have you découpaged any pumpkins this year? If so, please share a pic on the BNOTP Facebook page HERE. I'd love to see them!

Links referenced in this post:
Guest Room
Découpaged Pumpkin Tutorial
BNOTP Facebook Page
Patriotic Porch with Flag
French Bleu Giveaway
No comments:
Post a Comment