
The logical place for a home office was my son's old room. Chip left the nest many years ago and the room was left untouched since I had no need for the space. You can see more of this room, HERE.

Once I made the decision to turn Chip's room into a home office, I knew the direction I wanted to go. I loved the look of the Pottery Barn Bedford Collection. These were my inspiration pics/rooms.

On January 9th, 2011, I began the mammoth job of dissembling a room that had been in place for 20 years. It was physically exhausting and mentally draining. It was so hard to face that my little boy was really, really grown and gone. :( I know you Mom's and Dad's know what I mean. I boxed everything up, took all the furniture apart and hauled everything down to the basement and garage by myself. Advil was my best friend for a few days. The only two pieces I had to get help with were the large book case and desk.

Furniture was purchased both in-store and online since some pieces I wanted were not available in the store. I picked up the furniture that was locally in-store, hauled it home, and pulled it up my carpeted back stairway by those little yellow straps. I unpacked each piece and recycled the empty boxes back to the Pottery Barn recycle bin since the store is only two miles from my home. In the end, twelve boxes were hauled back to PB, if you count the boxes the smaller pieces came in. Whew!

Here's where much of the furniture lived (click for guest room) until the room was far enough along for furniture.

Next, I began the grueling job of striping the wall paper. I know y'all got tired of reading about my trials with this blooming wallpaper. ;)

After trying every product Home Depot sells and buying a steamer from Lowes,
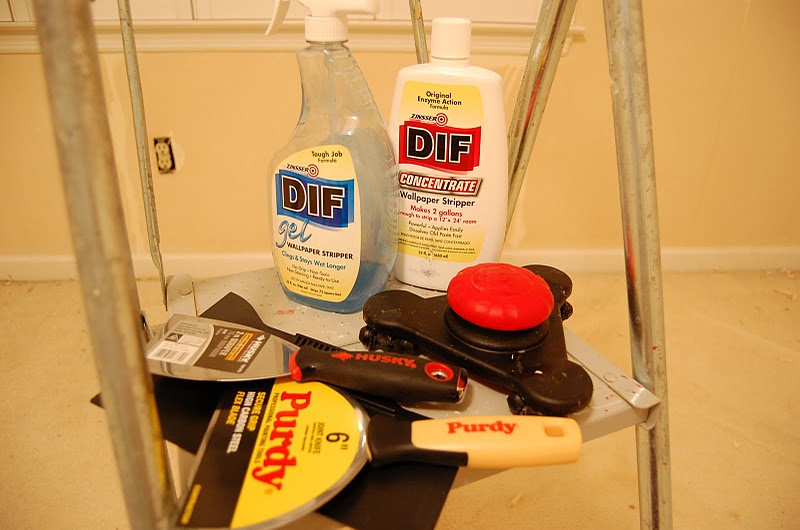
AND making my 185th try at removing the paper, the score was still Wallpaper: 185, Susan: 0.

Since the wallpaper removal took way longer than I ever dreamed, the date for the installation of the hardwood floors arrived. The hardwood flooring guy is always booked out a few weeks, so I went ahead with the flooring even though the backing of the paper was still permanently stuck on the walls. The pain down my neck and arms was a reminder this project needed to proceed.
The carpet was removed and hardwood floors were installed. I'm gradually "hardwooding" the entire house...got two rooms to go.


I temporarily gave up on the paper and went ahead and moved the furniture in. The neck pain was getting worse with each passing day. I needed a proper desk at which to work and one was just sitting idle in the room next door.
I had the desk surfaces measured for glass; it was cut, delivered and installed. Pottery Barn sells a plastic type protector for desks, but in the store it was sort of buckling up. I went with glass which was a little more expensive but very durable.

I decided to call a professional wallpaper remover in for an estimate. Though she declined to share the name of the product she tested on the paper, saying it was only available to the trade, I was able to figure out what it was and ordered some to try myself. It turned out it was not just available to the trade. You can read all about her visit and how I figured out what she was using in THIS post.
Over the years, I've removed wallpaper from 5 rooms in this house, and I've never had any real problems. This situation was beyond anything I've ever experienced. In the past, regular ole hot water did the trick. It was slow, but it worked. This time, nothing worked, until I found Safe and Simple. I guess that's why professionals use it. I still had to scrape it off, but the paper finally came off. What a huge relief!

Then it was time to cover the furniture with drop cloths and repair all the damage and gouges I had created on the walls while trying to remove the paper. This took several days and it involved wallboard joint compound, a putty knife and lots of sanding. Lots! Next to the wallpaper removal, it was the (second) worse part of this metamorphosis.

Somewhere along the way I ordered this chair from Pottery Barn Teen. It came in feeling wobbly, so it was returned and a new one was reordered.

I wanted a little sitting area in the office, so in between all the wallpaper removal and wall repair, I went shopping for chair. Found this chair in Pier 1 and it was love at first sight.

Once the paper was down and the walls repaired, it was time to prime (sniff, sniff) over the mural I had painted for my son so many, many years ago. You can read about that very difficult day HERE. Would someone explain to me why they can't stay 8 years old forever? ;)

I considered about every color of the rainbow for the walls. I narrowed it down to a soft green or my favorite stand-by, Duron, Sugar Cookie. I decided I didn't want the walls to compete with the pretty view of the greenery/trees outside my office windows. Plus, I love Sugar Cookie and have used it in many rooms of my home. It goes with EVERYTHING. No, really! It truly goes with every fabric, every furniture style, antiques, you name it. It's one of those paints that can feel casual or elegant. In the end, Sugar Cookie was my choice.
Home Depot still has the formula and can mix it up. In their system it may be listed as "Sugar Cook." Sherwin Williams has the formula, too but when they last mixed some up for me, it looked a bit too dark in the can so I never used it. Home Depot's formula is the one that looks like what I've always used. You can see that formula in THIS post.
Having been a while since I painted a room, I had a "paint panic attack" in THIS post when I began painting the office. I had forgotten how paint looks against white primed walls when you first start cutting it in.

I kept going and thankfully when I finished, it looked just the way I had envisioned. Relief!

During all the paper removal and wall repair I spent a good deal of time shopping for a light fixture locally and on eBay. I wanted something that didn't feel at all like it belonged in an office. My inspiration for lighting came from one of my favorite movies, Under the Tuscan Sun. You can tour Bramasole, the wonderful Tuscan villa in the movie in THIS post. I set my sights on an Italian tole chandelier for the office.

I almost won this tole chandelier on eBay...missed it by $10. I loved its whimsy, but it wasn't meant to be because...


While I waited on my contractor to come install it, I decided to hang the wallpaper craft organizer and a bulletin board I had purchased at Ballard Designs. I had planned to use the end of the desk (where Max loves to sleep) for wrapping gifts, so I wanted the organizer close by. I tried it on the wall behind the shutter, but I just didn't like the way it looked there. I decided to move it which led to purchasing additional Pottery Barn desk furniture for the other end of the desk.
I was glad I moved it because not only did the wallpaper organizer look much better on the other wall, but the additional PB furniture balanced out the whole layout beautifully. Even though more PB furniture had not been in my original budget for the office, I was planning on eventually buying something for that area at the other end of the desk. In the end, this worked out great providing additional storage and work space.
My contractor came out and installed the chandelier and the crown molding. I had him install crown molding in the guest room, too, since he was already here. He helped me re-hang the craft organizer. A few days later I found a new bulletin board and hung it myself. I loved the other one with the shuttered doors but the shutter design just didn't work hanging so close to the actual plantation shutters on the windows. So in the end, I changed to a different board and the shuttered board found a new home in the beautiful craft room of a local BNOTP reader.

A bee pillow I wanted was finally available at a price I was willing to pay.

I started adding in some decorative pieces like this adorable lady. She was labeled as a "French doll" but after I bought her, a friend told me she was a Santos. I had never heard of those but the history is fascinating. Mine is not an antique, those can be really expensive. She is a reproduction and I just love what she adds to this space.
I googled "Santos" and discovered a wonderful shop HERE that carries Santos. I was so excited to find they had my exact same Santos! They also have angels...love those!

There are a few new updates to the office this week, although nothing huge. I had a Pier 1 coupon that was about to expire, so I used it for another cushion for the office chair. I still love the other one, but I thought it would be good to have a spare.

The cushion was originally $24.99 but with the coupon, I only paid $4.99

I've been antiquing and thrifting for way too many weekends, searching for a table or small chest I could repaint or redo to go beside the green and white chair in the sitting area of the office. I hadn't found anything that was what I really wanted. Last night I decided to see what fun things were online at Pottery Barn Teen; that's where I found my cute desk chair.
I found THIS sweet table below and at only $99, it was perfect. It should be a great height for the chair. Unfortunately, they don't stock it at the PB Teen near my home, so I had to order it. It was in stock online so it should arrive soon. I almost went with the bright pink but I decided to go with the white since the pink wouldn't work that well with the bee pillow I have in the chair. The pink is awesome, too, isn't it?

Update: Finally found the chest I had dreamed up in my head. You can read about it, HERE


Update on 08-28-11: Added a small "library" to the office. Click HERE to read more about it.

A final look at the office:


It has been quite the journey...this creation of a home office. Thank you so much for coming along and for all your suggestions, encouragement, and support. You were there with me every step of the way, holding me up and encouraging me when I wondered why in the world I had taken on this huge endeavor all alone. I love you, guys! Thank you from the bottom of my heart for your steadfast friendship. You are a blessing in my life!
Adding this post to Sarah's party HERE.

Metamorphosis Monday:
If you are participating in Metamorphosis Monday you will need to link up the permalink to your MM post and not your general blog address. To get your permalink, click on your post name, then just copy and paste the address that shows up in the address bar at the top of your blog, into the "url" box for InLinkz.
If you'd like to include the MM button in your post, just copy and paste the Met Monday button to your computer or grab the html code from underneath the MM logo under the "Join a Blog Party" header at the top of this blog.
In order to link up, you'll need to include a link in your MM post back to the host blog, Between Naps on the Porch so your regular readers will be able to find the Met Monday party which ensures your friends and fellow bloggers will receive lots of visits, too. Isn't that what a party is all about? :)
PLEASE DO NOT type in all caps...it spreads the links waaaay out. Thanks! :-)
Let's try something fun today! Please visit the person who linked before you and after you...that way everyone will get some visits. Hope you'll visit more, of course. :-)
Welcome! Thanks for coming to the party!
No comments:
Post a Comment