
Before we get started, let me torture you with one more photo I found online at Pottery Barn using this same garland. ~~~SIGH~~~ You may remember I mentioned the PB garland is only 5 feet long. Notice anything about the column on the left as compared to the one on the right? Apparently, they didn't have enough garland to complete the job for the photo shoot. I never would have noticed this if I hadn't been analyzing these pics so much to make my own. I love the large lanterns they have shown on the ground. Beautiful!

I could stare at these scenes all. day. long! Soooo, pretty!
If you're a bit curious about this home that was used in the PB shoot...
Here's a pic from Google Maps of what it looks like in real life. It was built in 1850 and was the home of Captain Andrew Sampson. It's located at: 1157 Division Street, Napa, California and apparently it's home to a business now. You can read more about this home, HERE.

Update: Frances just shared a link to the video below showing how this photoshot was completed in CA in June! That's a lot of fake snow!!! :) Thanks, Frances!
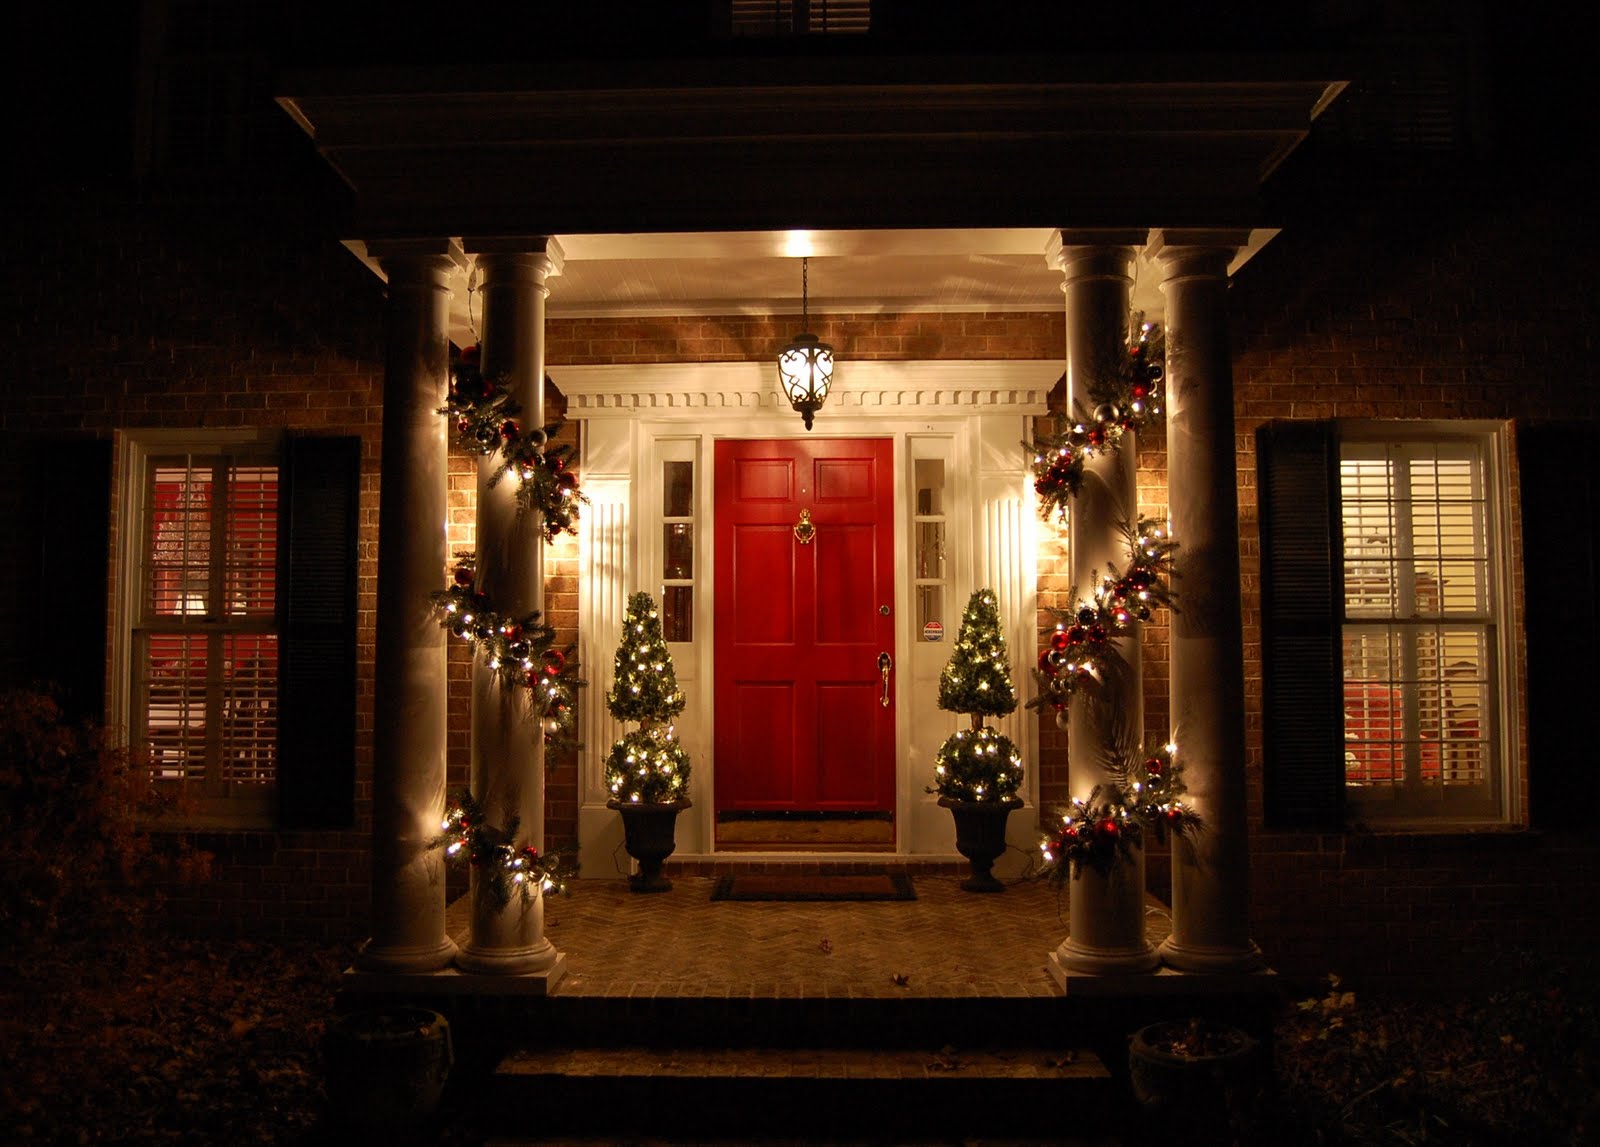
Pottery Barn Inspired Garland Tutorial:
To make the garland shown below on my front porch (and in this post) for less than half the price of the Pottery Barn garland...

I purchased this lit garland from Lowe's. It's 9 feet long so two were just long enough to wrap three times around each column. (Tip: Make sure the garland you buy to use outside is certified for outdoor use.) Take a long string or rope and wrap it around your columns to see what length you'll need before purchasing your garland. If you wish to wrap it around more than 3 times, you may need additional garland. I bought lit garland but you can find the unlit garland for even less.

If you have lit garland, before you begin to put the ornaments on, plug your garland in and test it to make sure the lights work. You don't want to get it fully decorated and find that you have a faulty garland. I stretched mine out across my kitchen counter to work on it. It took me around 45 minutes to completely cover each garland in ornaments...so about an 1 1/2 hours to do both. This is fun to do while watching t.v.

I purchased plastic ornaments because that's what comes on the PB garland. Glass ornaments would not hold up well to temperature/weather changes very well. I bought the ornaments at discount stores: Old Time Pottery and Dollar Tree.
In the close up pics on the PB site, you can see their garland is covered with shiny and satin finish ornaments. So I bought shiny and satin ornaments, too. Also, I bought ornaments that look as if they are covered in glitter. It took 7 boxes (each containing 24 ornaments) from Old Time Pottery, and two tubes of ornaments from Dollar Tree ($1 each) to completely cover my two garlands. That's around 180-200 ornaments, total. To attach the ornaments, I used some green coated twist type wire I already had. I think I bought it years ago in a garden store. It was a little brighter green than I would have preferred, but I already had it and I knew it would be hidden by the ornaments and greenery on the garland. You can just see the wire on the counter to the right of the ornaments in the picture below.

Before you get started, if you have a glue gun, plug it in nearby. Occasionally you are going to have a plastic ornament pop out that isn't really tight in its top. If an ornament pops out, just use a little hot glue and reattach it.
Start by spreading out the branches on your garland. You'll only need to attach the ornaments to the top side since you'll want it nice and flat on the other side to wrap around your columns or wherever you'll be decorating.

It's best to attach your biggest ornaments first. I initially used some realllly large ornaments but I decided later they were out of proportion to the rest of the ornaments and I took them off. Medium, small and very small ornaments work best for creating the PB look. The smallest ornaments I used were the ones I found at Dollar Tree...they came in tubes.
Spread out the colors:
To get the different types/colors evenly spaced out, I set them on or near the garland where I wanted them before wiring them. I first took all the shiny reds and spaced them out and attached them. Then I took all the shiny silver ornaments and spaced them out along the garland and attached them. I continued that process until all the ornaments were attached.
Attaching the ornaments:
I attached the ornaments to the center of the garland with the green wire. Some will fall naturally to the left, some to the right...so that will give it a nice look. On one garland, I cut off the excess wire as I went along. When I worked on the second garland, I decided to attach all of the ornaments first...then I flipped the garland over and cut off all the excess green wire at one time. In this pic below, you can see the excess wire. While you are wiring on the ornaments, it gives you an opportunity to use the wire to pull in the "lighting wire" a little tighter to the center of the garland. In other words, if the lighting wire is sort of sticking out on your lit garland, pull it inward when you wire on your ornaments for a nicer look when finished. You can see how I did that in this pic below.

Here's how it looked after I snipped it off. You don't have to cut that closely. I just didn't want to risk scratching the paint on my columns.

As you work, occasionally an ornament will pop out of its top or the plastic top might break.

Just reattach with a little hot glue and you're good to go.

Here are a few pics I took after I was finished. I later removed the really large bulbs and replaced them with medium size bulbs.


The garland I purchased from Lowe's had these long wired pieces on the end...

Since my columns are pretty fat, it helped to stretch my garland a bit so I could wrap each column with just one 9ft. garland. I used the 3M hooks that are supposed to be easy to remove to attach the garland to the column. Update: When it rained, the 3M hooks let go of the pole. So I ended up hammering a skinny little nail into the top of the pole on which to hook the end of the garland. That held perfectly.

Here's a close up of one section on the column...wish I'd pulled that silver ornament up out from under the greenery before I took the pic. Why do we always notice this stuff after we take pics.

I ran into a little snag when plugging in my garland. The plugs on the garland only have the holes/prongs that are narrow...and my extension cords all had the prongs where one side is big and one side is little. I know there's a name for that, but I have no idea what you call it. I looked at Lowe's and they didn't have extension cords that would plug into the garland. So, I bought one of these.

I cut the end off my extension cord and attached this plug. The directions are on the package plus the nice Lowe's guy told me how to do it.

Then I was able to plug in the extension cord I had run across the top of my porch from one garland to the other garland. If your garland isn't lit, you won't run into this. Or, you may be able to find extension cords that work with your garland.

I still have more decorating to do on my porch (wreath, etc...) but I wanted to share the garland tutorial now so you'd have time to plan if you wanted to make some for your porch or stairway rails, etc...

Final Costs:
Final cost for both lit garlands was $88.87 vs $218 from Pottery Barn...and the PB garland's isn't lit. If you chose to use garland that doesn't have lights, your cost should be closer to $50 to do two columns, using 9 ft garland.
So, that's about it. Hope this little tutorial helps if you decide to make your own PB inspired garland. If you've enjoyed this tutorial, please share the link with a friend or two. Thanks in advance!
Linked for House of Hepworths blog party.
No comments:
Post a Comment