After getting it home, I got down to work. This was B.B. (Before Blogging) so taking pictures almost didn't happen. Somewhere in the midst of sanding the piece, it dawned on me that it might be nice to take a "before" pic, just to remember how it looked prior to painting.
The photo below is of the lower half of the hutch, minus the drawers and brown metal knobs I'd already removed. You can see I had already started sanding to remove the shiny finish. Whenever you paint a piece of furniture, after removing the hardware, you'll need to lightly sand the piece to remove the finish/sheen. This helps the primer adhere better, ensuring a better paint finish in the end.

Side view after some sanding...

Once I had lightly sanded the hutch, I primed it using Zinsser Primer purchased from Home Depot. Here's a view of the top half of the hutch, partially primed. You can roll on the primer if you like. I just used a paint brush.

Once the hutch was primed and the primer had dried, I lightly sanded with a fine grit sand paper, to give it a nice smooth finish that was ready for paint.

I had to do all the painting of this piece in my kitchen since it was still late winter/early spring and very cold outside. The downside to that was I kept painting it the wrong color! I learned the hard way, it's best to paint a piece of furniture in the location where you will actually be using it.
I painted the hutch 3 different shades of green (2 coats of each) before I finally got the color right. The first coat was way too pale and the second coat looked great...until I pulled the hutch out onto the sunny porch. It looked very different on the porch than it did in my kitchen.
So there are 6 coats of paint on top of the primer...learn from my mistake! :-) Always pick your paint in the lighting/area where you'll be using the piece. This was the final color, although this photo doesn't really do it justice.

A Few Tips on Painting Furniture:
I could have applied the paint with a small paint roller and that often helps with getting a smoother finish. I opted to just use a brush. I always spend a little and buy a great brush if I'm worried about the paint finish. I prefer Purdy brushes.
A neat trick to getting a nice smooth paint finish with a latex paint is adding a paint conditioner to your paint. Floetrol is a great one. It helps latex paint to go on as if it were an oil based paint. No kidding! It also slows the drying process down just a bit, which is helpful if you are a fairly slow painter like me.
The following pic was taken at night, after the hutch was in its rightful spot on the porch. Of course, it didn't take me long to start loading it up with fun things to display...including a collection of birds nest I'd found abandoned over the years in my yard.

The guys at the paint store recommended I use an exterior grade paint, even though the hutch was in a protected area. That was so it would be protected from temperature fluctuations and humidity.

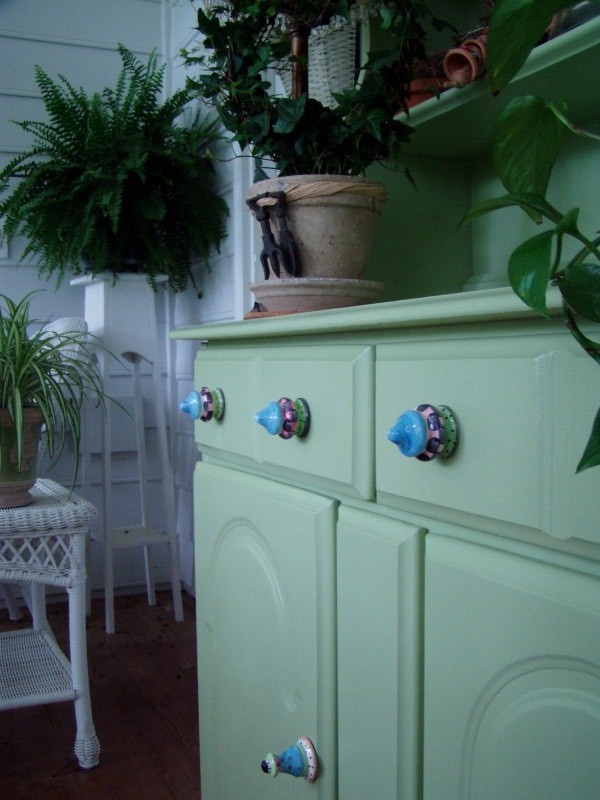
I hit just about every little antique and craft shop in town looking for whimsical knobs, until I finally remembered I had seen them at the "Queen of Hearts," a little antique shop in Marietta, GA. I raced over there just to find out the booth had been moved to another Queen of Hearts location in Alpharetta, GA. After a 45 minute drive, I finally had some cute knobs.

Aren't they just the silliest knobs, ever? I could have purchased six matching knobs, but I really liked the idea of mixing it up a bit.

The inspiration for the color of the hutch came from the placemats and matching napkins you see below in this tablescape. After failing to get the color right two times in a row, I decided to look for an object around the house that was the color I was going for on the hutch. I remembered the green placemats/napkins and took a napkin to Home Depot and said..."Match this, please!"

Since I only needed one quart of paint (as opposed to a gallon) they couldn't match to my napkin in their usual way. The HD guy told me that he cut the formula in half...or something like that. Here's the top of the can in case anyone wants to know the color formula. The writing on the top says 50% because of the way he cut the formula. He didn't match the napkin exactly but I loved the color...finalllllly! :-) Again, this is exterior grade paint since this piece would be subjected to temperature changes and humidity.

I'm always getting asked where I store all the china I've collected. The hutch holds two of the sets of china I like to use out on the porch.

This was the first piece of furniture I've ever painted. It was actually much easier than I thought it would be, well, except for that "getting the color right" part. :-} If I can do it...you can, too! .

No comments:
Post a Comment