Do you ever see intricately carved pumpkins and wonder how they did that?

Well, it turns out, the trick is using a tool like you see on the left and not like you see on the right...

So, where do you get those teeny little saw cutting tools? I found mine many years ago at Williams-Sonoma. I think this kit was around $20, which seemed like a lot at the time...but it was totally worth it. You can find them online with a google search. Check Michaels and other craft stores, too. Maybe Williams-Sonoma has them again this year...haven't been in one in a while so I'm not sure.

Here are all the tools that came in this kit...

It also came with 6 templates. Whenever I carve a pumpkin using one of the templates, I always make a copy of the template to use. This preserves the original template for future Halloweens. Each year, I have to carve the Black Cat...he's my favorite. (Note the carving tips at the bottom of the template.)

I usually buy a medium size pumpkin to use with these templates. Before you get started, cut a hole in the top and lift the "lid" of the pumpkin off and scrape out the inside...my least favorite part. When cutting the hole for the lid, slant your knife inward so the lid will sit on top and not fall in later.

Next, you cut the extra paper you don't need from around your template...then tape the template onto your pumpkin.

Next step: Poke tiny holes all around the design on the template...

To do that, you use one of these poker thingies. The kit came with the poker you see on the left. I actually always use the one you see on the right. It came in an old tool kit with my ancient Kenmore sewing machine.

Here's how it looks once you poke holes every 1/8 to 1/4 inch around the design. Even though the template gets removed after you punch the tiny holes, you still refer back to it during the cutting process. So, I placed an R on the sections that get removed just to remind myself to cut out the dark sections, not the light.

I carved two pumpkins last night...here's how the backside of the templates looked after I had placed them on the pumpkin and punched a gazillion holes through them into the pumpkins.

Now, I have to tell you what happened next...
After I got the cat template taped onto the pumpkin, I took it upstairs and sat with it in my lap and punched all the teeny holes. Then, while I watched Sunday's episode of Desperate Housewives online, I cut out the dark sections. I was so proud of myself for not slicing through any parts I shouldn't, like that tiny spot between the kitty's eyes. Once finished, I headed down stairs to put a candle inside to see how he looked, only I forgot that I had left...
this in the kitchen floor. I had placed a big garbage bag on the floor to scoop out the inside of the pumpkin and when I came downstairs into the dark kitchen, I couldn't turn the lights on because I was carrying my newly carved pumpkin.
Well, let me tell you...a banana peel "ain't got nothing" on the inards of a pumpkin in the slippery department. In the darkness, I reenacted that scene out of the movie Home Alone where the robber is trying to stand on the steps Kevin sprayed down with water earlier in the day...they had become a sheet of ice. It was a miracle I didn't drop the pumpkin on the floor. Instead, it went flying across the kitchen counter and crashed into the back splash...or at least I think that's what it did...it was too dark to see. You can just imagine how much fun this was to clean up later.

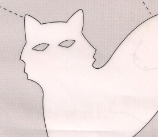
After sliding around for what seemed like an eternity, I managed to get back steady on my feet and get to the light switch. When I looked at my newly carved pumpkin...HORRORS! Half of the cat's face was GONE! My carved kitty looked like this...I was not amused! :(

And pumpkin bits were everywhere! (LOL) I had to laugh...Hollywood could not have scripted a more ridiculous scene!

I searched for about 10 minutes for the other half of the face and had given up and was starting to clean up pumpkin bits when I finally found it at the far end of the counter behind the mixer. Using a straight pin, I reattached it. In that whole disaster, the tail was also broken where it attaches to the cat. :( I had done such a good job on that tail...dang it.

Here's how it looked on the kitchen counter with the lights turned off. Notice the reflection in the granite counter...cool!

Here's how it looked out on the porch...

Another porch shot...

After that little disaster, I decided to try my hand at one more...

I managed to keep this one intact...no Home Alone scenes in the kitchen this time. ;)

Here are three of my favorite templates from this kit. The first two are the ones I carved and have shown here in this post. Just right click and choose "copy" and "paste" them to your computer. Or right click and choose "save" to save them to your computer. Then enlarge them on a copier to whatever size you like. You may even be able to enlarge the templates on your computer. The templates that come with the kit are on a standard 8 1/2 by 11" paper size.
There are little tips on the bottom of each template...they are important because they tell you which sections to cut out first. It is best to follow them exactly.

Another tip: The dotted lines on the white sections of the paper...those are areas where you crease the template to make it fit on the round pumpkin, if needed. The dotted lines on the dark areas are where you can cut when you're done carving to help remove the big sections that need to be removed.
Happy Carving! :)

No comments:
Post a Comment