Showing posts with label Holiday Craft. Show all posts

Tuesday, 20 December 2011

Christmas Mice Ornaments or Present Toppers: A Tutorial

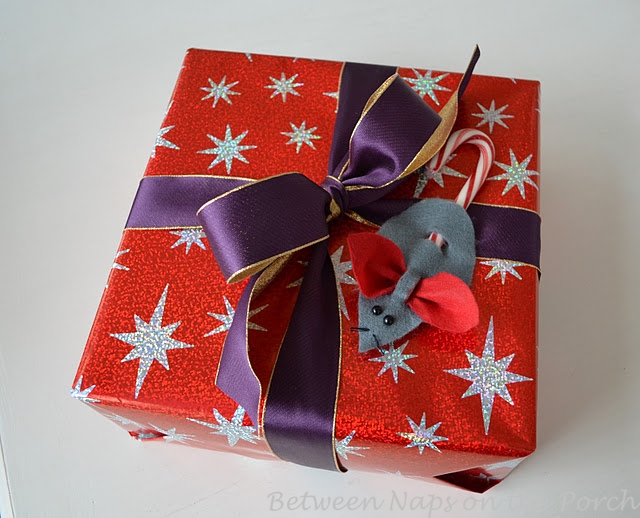
Looking for an ornament or present topper? Christmas mice with candy cane tails make cute ornaments for the tree.   They are also great little present toppers.  This is a great craft for all ages.  I have a faux candy cane tucked inside my little mouse below, but you'll probably want to use a real candy cane if you attach these to a Christmas present.  The faux candy canes work great when making these to use as ornaments.


Here's how Mr. Mouse looks with a real candy cane tail.


Tutorial for Candy Cane Mice:


Supplies you'll need:
Red felt
Gray felt
Black thread for whiskers
Googly eyes or black dots/beads
Craft glue
Candy canes (real or decorative)

Here's a template you can use to make your mice.  It shows the measurements for cutting your red and gray felt.  Save the template below to your computer, then just print it out.  Or, free hand the shape onto a piece of card board to create your template, using the measurements below.


Once you've finished cutting the mouse's body from the gray felt and the ears from the red felt, cut two small slits about 3/4 inch from the back, just big enough for a candy cane to fit through. You'll also need to cut two slits near the front for the ears to pass through.  (See picture for placement.)


Thread a needle with black thread, then just pass it through the felt nose a couple of times.  Snip off the ends of the thread to create the whiskers.  Glue on your eyes with any craft glue...only takes a tiny, tiny bit of glue.

Poke your ears through the little ear slits.  Tuck your candy candy through the slits at the back and up under the ears.  Here's how your mouse should look in back with the candy cane in place:


In the past when I've used these as ornaments for the Christmas tree, I used real candy canes.  If you do that, don't forget to remove the candy canes before storing them away for the next year.  I eventually found plastic candy canes and now I use those each year for the tree ornaments.  It's fun to use real candy canes when making these to go atop a gift.


'Tis the season, so I swapped out the "general" gift wrap in the organizer for Christmas paper and got busy wrapping Christmas presents today.  (Wrapping station came from Pottery Barn about 6-8 months ago...added during an office renovation HERE.)


When placing your little mouse on a gift, just tape the candy cane onto the present underneath the felt where it won't show.  This Christmas mouse reminds me of some other Christmas mice.  You can read about those mischievous mice, HERE.

Friday, 28 October 2011

A Blue and White Pumpkin for the Guest Room

There were so many wonderful tablescapes posted for yesterday's Tablescape Thursday!  I got a kick out of all the Halloween table settings--so whimsical and fun!

French Bleu Vintage Giveaway:
The Shopping Spree giveaway from French Bleu Vintage is still underway.  Click HERE to leave your comment to be entered.

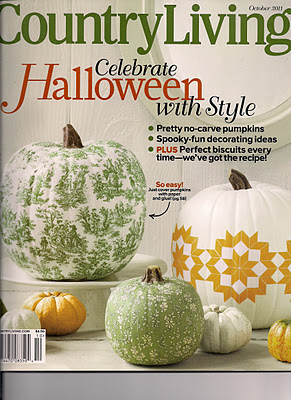
A couple of weeks ago I posted about these wonderful découpaged pumpkins I found in the October issue of Country Living.


That post (HERE) also contained a little tutorial showing how you could découpage a "craft" pumpkin.


You may remember the pattern I chose for my pumpkin was the floral fabric on this cute pillow.


Here's how it looked when finished.  I had so much fun with this one, I really wanted to découpage at least one more pumpkin before Halloween was all gone for another year.


I chose a fabric pattern from the guest room this time.


Can you guess which one?


 I am slightly obsessed with blue and white.  It's just such a crisp, sharp combination.  I love the book, A Passion for Blue and White by Carolyne Roehm.   Do you love blue and white decor, too?  It seems to be a color combination that never goes out of style--a classic color scheme.


For my pumpkin this time, I decided on this Ralph Lauren fabric pattern called, Porcelain.  It's the fabric found in the pillow shams on the guest bed.


I drove back over to the same Office Depot and ran off some copies of one of the shams.  Again, I only used around 6-8 sheets.


Next, I painted the orange craft pumpkin, white.  I didn't want to take any chances on that bright orange showing through the white sections of the paper.  It took two coats of white acrylic paint to cover it fairly well.  I used the same white paint I previously used when I made/painted a patriotic flag for the porch, HERE.


The lighting in the guest room is always a bit tough for photographs since it's on the north side of the house.


So, I took Mrs. Pumpkin out on the porch for a few natural-light photos.  You can really see the true colors out here on the porch.


I really love how it turned out.  The central design that appears several times on the shams is visible in this photo.  It depicts two exotic-looking birdies up in a tree.  I put that pattern on the front and back side of my pumpkin.


Then I just filled in the rest of the pumpkin with the other parts of the design.  This pumpkin definitely took longer than the one I posted about before.  It was tricky matching up this intricate pattern--kind of like putting together one of those puzzles where all the pieces look the same.

You'll find the previous post showing how to découpage a craft pumpkin, HERE.  It's really easy.  Just don't rush--take your time.


I'd still love to découpage something with the graphics from the Pictorial Webster we saw in the Country Living magazine.  I don't think I want it to be a pumpkin, though.  Ummm, I'll think of something.

Have you découpaged any pumpkins this year?  If so, please share a pic on the BNOTP Facebook page HERE.  I'd love to see them!


Links referenced in this post:
Guest Room
Découpaged Pumpkin Tutorial
BNOTP Facebook Page
Patriotic Porch with Flag
French Bleu Giveaway

Saturday, 22 October 2011

A New Use for Those Power Tools

Sharing a few links from past Halloweens here at BNOTP and a new use for those manly power tools.  I love what he did with the Dremel!

Just click on the links to view each post.

Power Tools and Pumpkins:   Power tools make any job easier...even pumpkin carving!


Rat Infestation!  I saw these again this year at Michael's.  They may be my favorite Halloween decorating idea, ever.  I know the real ones aren't cute...but these totally make me smile each time I go up the stairs.


A Halloween table setting with a spider web tablecloth


Sharing three fun templates for carving your pumpkin this year.

Tuesday, 11 October 2011

Country Living Inspired: Découpage a Pumpkin

There is sooo much inspiration to be found in Blogland these days, the cover of a magazine has to REALLY grab me to convince me to buy the magazine.   The October issue of Country Living did just that. I loved the toile covered pumpkin on the cover. I glanced inside and saw there were directions with the "how to."  I couldn't wait to give it a try.


Another pumpkin inside was decorated using images from Pictorial Webster's: A Visual Dictionary of Curiosities


I was stunned to see this pumpkin in Country Living because this was one of the books I purchased right after I added a small library to my office, HERE.  I would love to make this one, too.  Isn't it awesome?


Supplies you'll need to Découpage your pumpkin:
A Craft Pumpkin
Mod Podge
Foam Brush
A fabric you love (you don't actually use the fabric...more on that in a sec)


I didn't want to buy a yard of fabric just for this project, so I searched around the house for something I already had that I thought would make a cute pumpkin.  I spied this cute pillow in my Master Bedroom.


My friend, Carol, made it for me a few years ago and I love the cute floral fabric she used for the center and back of the pillow.


To create this pumpkin, you will need to photocopy the fabric you wish to use.  Then you will découpage that onto your pumpkin.  I tried copying the pillow pattern on my home copier but it didn't work too well.  I think my printer was low on colored ink.  So, I headed off to the Office Depot near my home.  They easily copied it on their color printer.  Copies were .49 cents each.  I asked for 10 copies, but in the end, I only used 6.

Tip:  Copy your fabric on a laser printer (not ink jet) to avoid problems with the design/print running or smearing once you apply the Mod Podge.

One More Tip:  If the pattern you choose to copy has a direction to the pattern, try to copy it with the pattern going the longest direction on the paper.  For example, if you're copying your fabric pattern onto standard copy paper which is 8.5 x 11 inch paper, have the direction of your pattern going the length of the paper...the long way  (11 inches).   Mine was not photocopied that way.  It was photocopied with the pattern going the short way...the 8.5 inch way.  I'll explain why it's better to go the other direction in a sec.


Here's how the copies looked...pretty much exactly like the fabric.


Here's a view of the back of the pillow...that's the side the guy at Office Depot used to copy the pattern. I was amazed at how great a job their printer did.


You will need to cut your paper into one inch wide strips.  I turned over one piece of paper and drew lines in 1 inch increments.  Then I held three sheets together and cut them all at once.


After you cut out your strips of paper, using a foam brush, lightly apply Mod Podge to the back of one of the strips of paper.  Then starting at the top of your pumpkin, right underneath the stem, apply the strips of paper to your pumpkin.

Now, the reason you want the pattern to run the long way (the 11 inch way) is because on a small to medium size pumpkin like the one I bought at Michael's, 11 inches will stretch all the way from the stem to the bottom of your pumpkin...and will curve underneath.  That means, you'll have very few "seams" running sideways on your finished pumpkin.

Unfortunately, since I didn't know to tell the nice guy at Office Depot to copy it that way, my 8.5 inch strips ended pretty high up, so I have lots of  seams running around my pumpkin.  You can see in this pic below (on the left side) where my 8.5 inch strips ended.  So, if your fabric has a pattern that has a definite direction (like my floral fabric)  if you can, copy your fabric where the pattern direction runs the longest length of your paper...not the shorter direction.


If you're planning on making a toile pumpkin, the directions for the green and white toile pattern shown on the front of the magazine suggests "tearing" out the toile scenes, leaving about 1/4 inch of white space around each scene.  Then you découpage those onto the pumpkin.  In other words, if you're using a toile pattern, after you copy it onto paper, don't cut your paper into strips for that type pattern.  Instead tear out the individual scenes and découpage those onto your pumpkin.  The torn edges will feather out, per the directions...and look better than if the scenes were cut out.


This was the very first time I've ever used Mod Podge or découpaged anything.  It worked great!  Once you finish découpaging your pumpkin and have it fully covered, you put a very light/thin coat of Mod Podge all over the pumpkin.  The directions recommend placing your pumpkin on a bowl, cover one side with Mod Podge, let it dry, then turn your pumpkin over and do the other side.  It dries very quickly.

If your pattern is light colored, the directions for the green and white toile pattern suggests painting the pumpkin with two coats of a flat, acrylic paint in the color of the background of your fabric, prior to applying your pattern.  I ended up not doing this because the orange of my pumpkin did not show through the paper/pattern I chose.  Just check that first before you start découpaging.

Tip:  You may need to make a tiny cut in your paper occasionally to make it lay down flat on your pumpkin surface.  That's better than getting a yucky wrinkle...something I learned the hard way.


Here's the finished pumpkin.


A bit closer view


This was a super easy project to do.

Costs Breakdown:
Pumpkin: On sale for 50% off at Michael's: $6.49
Mod Podge: used 50% off coupon from Michael's website and bought a large 16 oz bottle: $4.50
Foam brush: .07 cents
6 Color copies of my floral pattern from Office Depot: $2.94
Total Cost:  $14.00

You can do this project for less if you buy the smaller bottle of Mod Podge, but I wanted to have some left over for any future projects.  I still may do the Webster's Pictorial pumpkin. :)  As it turned out, it doesn't take much Mod Podge at all, so a smaller bottle would still leave plenty left over for future projects.

Related links in this post:
Master Bedroom
Office Library
Pictorial Webster's: A Visual Dictionary of Curiosities

Sunday, 9 October 2011

Decorate Your Pumpkin with Ribbon: Welcome to the 142nd Metamorphosis Monday!

Happy Met Monday! How was your weekend? I've had a busy one. Saturday, I drove down to Macon, Georgia and attended a class for "extreme couponing" with my sister and niece. I watch so little TV, I didn't even know what extreme couponing was. It was really interesting. If you have a good size family, I can see how the savings could really add up. I'll share some of what I learned in a post sometime soon. I had no idea using coupons had become such a big thing...practically a sport!

So, there I was the other night, lying in bed and trying to envision a way I could decorate a pumpkin without cutting into it or painting it, when suddenly I had an idea.

Ribbon!


Here's a pic of my finished pumpkin out on the porch where the lighting is a bit better.  This may be the easiest pumpkin decorating idea in the history of the world of pumpkin decorating.  Seriously!  If you like easy, you're gonna love this.


I used the pumpkin I already had...the one that's visible in the background in THIS post from Tablescape Thursday.


Supplies you'll need:
Medium size pumpkin with a stem
2 colors of wired ribbon (my ribbon was 1 1/2 inches wide)
1 napkin ring

I bought two types of ribbon (on sale 40% off)  from Hobby Lobby.  I chose one with a leaf pattern and one with a metallic/shiny finish.  You won't need a lot of ribbon for this project...just depends on the size of your pumpkin.   You'll want to cut 4 or 5 strips of each color ribbon.  For my medium size pumpkin, I cut four, 50" strips of ribbon, from each color.  So I cut 8 strips total and each was around 50" long.


The other thing you'll need  is a napkin ring.  I decided to use one of these pine cone napkin rings I've used previously in a Thanksgiving table setting HERE and HERE.  They had a nice fall feel.


Just slide your napkin ring down over the stem of your pumpkin.  Next, place your pumpkin on top of one of the strips of ribbon you've cut, centering the pumpkin on top of the ribbon.  Pull one end of ribbon upward and tuck it up under the napkin ring, pulling it out the top of the ring, as shown.  Do the same thing for the other end of that strip of ribbon, pulling it up on the opposite side of your pumpkin.


Continue doing this with all the ribbon you've cut for your pumpkin, spacing the strips of ribbon out whatever distance you prefer.


Closer view:


As you pull your wired ribbon up and under the napkin ring, you can bend the ribbon downward as shown below to just help hold the ribbon in place.


It will look like this when you have all your strips of ribbon pulled up and through the napkin ring.


Turn the ribbon strips downward, bending your wired ribbon at whatever angle(s) you like best.  I also cut the ends/tips of my ribbon strips at an angle because I just like that look better.  You can just see the pine cone peeking out from the ribbon.


Here's a view of the other side of my pumpkin...


Ribbon really dresses a pumpkin up.  The ribbon I chose actually added a touch of elegance to my pumpkin.  I wasn't really expecting that, so that was a nice surprise.


A close up of the top of the finished pumpkin.  I tucked the ribbon down under the pine cone so it would be a bit more visible.  This would be cute with any fall-ish napkin ring.


A ribbon bedecked pumpkin would make a nice centerpiece for a Halloween party or buffet table.


Click for more  Halloween decorating ideas. (Scroll down to the Halloween section.)

Related links in this post:
Thanksgiving Table Setting with Pine Cone Napkin Ring
2nd Thanksgiving Table Setting with Pine Cone Napkin Ring


Looking forward to all the Before and Afters for this Met Monday!

To receive the latest posts, as well as updates about blog parties, subscribe via an RSS Reader or have BNOTP delivered right to your Inbox.  You'll find links to subscribe via RSS and Email on the sidebar to the right.  Thanks for reading; so glad you are here!

Reading this post via e-mail or RSS feed?
*If you are reading this via email or RSS feed, to view all the tablescapes linked for Tablescape Thursday, click HERE.


Metamorphosis Monday:
If you are participating in Metamorphosis Monday you will need to link up the permalink to your MM post and not your general blog address. To get your permalink, click on your post name, then just copy and paste the address that shows up in the address bar at the top of your blog, into the "url" box for InLinkz.

If you'd like to include the MM button in your post, just copy and paste the Met Monday button to your computer or grab the html code from underneath the MM logo under the "Join a Blog Party" header at the top of this blog.

In order to link up, you'll need to include a link in your MM post back to the host blog, Between Naps on the Porch so your regular readers will be able to find the Met Monday party which ensures your friends and fellow bloggers will receive lots of visits, too.

PLEASE DO NOT type in all caps...it spreads the links waaaay out. Thanks!

Let's try something fun today! Please visit the person who linked before you and after you...that way everyone will get some visits. Hope you'll visit more, of course.


Welcome! Thanks for coming to the party!