Showing posts with label guest post. Show all posts

Wednesday, 23 November 2011

[Vegan] Salted Chocolate Chip Cookies

Today I thought it would be fun to have one of my closest friends (and bridesmaids!) do a guest post on vegan baking. Shannon just started her blog in the past week or so and we decided to trade a blog design for some awesome vegan baking guest posts! If you've got any last minute time to kill, maybe you could whip some of these bad boys up for your Thanksgiving festivities tomorrow! Enjoy!
♥ ♥ ♥ ♥ ♥ ♥ ♥ ♥ ♥ ♥ ♥ ♥
Hi! My name is Shannon. I recently started my blog, Leaves & Flours, because I wanted to show people that neither baking nor veganism were too difficult. When I went vegan I had to learn how to bake all the treats that I knew I would miss otherwise. And really, nothing makes me happier than sharing treats with people.

There's a DC based bakery named Sticky Fingers (you may have seen them on Cupcake Wars) that makes a sweet and salty chocolate chip cookie that I love. Since I appreciate it so much, I thought I would share with y'all my own recipe that was inspired by their creation. If you have any questions about vegan baking, don't hesitate to ask!


Salted Chocolate Chip Cookies
yeilds approximately one dozen

½ cup vegan butter*
½ cup brown sugar
¼ cup granulated sugar
1½ tsp vanilla extract
1 Ener-G egg or other egg replacement**
1 cup all purpose flour
1/3 cup old fashioned oats
½ tsp baking sode
1/3 tsp salt & extra salt for sprinkling
1/3 cup chocolate chips


Allow butter to soften at room temperature at least 30 minutes. Preheat oven to 375F. Cream butter & sugar. This may take some arm strength. Add vanilla & egg replacer, mix again. Mix in dry ingredients, aside from chocolate. Gently fold in chips. Using a cookie scoop or tablespoon, drop approximately 1" balls of dough spaced at least an inch apart on an ungreased cookie sheet. Slightly flatten balls of dough with palm of hand. Bake 10-12 minutes, rotating tray once during baking. After removing cookies from oven, sprinkle with extra salt to taste. I prefer sea salt, but any should work.

* I use Earth Balance
** You can find Ener-G in most grocery stores, and one box has lasted me 3 years. As a different egg replacer, I recommending mixing 1 tbsp ground flax seeds with 2 tbsp water.


Friday, 30 September 2011

Featured Sponsor: Saturated Canary

This month we have Krista from Saturated Canary here with us (again!) as our Featured Sponsor! Krista was also our featured sponsor back in June (you can read her guest post on wearing white here!). She's a real sweet gal and I'm so glad to have gotten to know her over the past handful of months. She's an absolute regular around here so I'm sure you've seen her by now! If you haven't, I definitely urge you to check her out! She's way talented! (Look at this awesome little character drawing she did of me!) Anywhoo, today she's here to dish on some funky hair... dreads! I'm all for different and wild hair and I know that the majority of you are, too (otherwise you probably wouldn't read LCH!). Even if dreads aren't for everyone, I know it's so very easy to appreciate them. They're just so neat looking! Please make Krista feel welcome and Enjoy! xo

♥ ♥ ♥ ♥ ♥ ♥ ♥ ♥ 

Hello!  My name is Krista.  I am the artist and mama behind Saturated Canary.  I've kinda been a stalker of Kaelah's for a while now;)...One of the first things I loved was her most awesome, ever-changing hair! I love a girl who gets as bored as I do with the same old hair, day-in day-out!  Kaelah's hair rocks-- however she chooses to wear/ accessorize it.  (I love her Etsy shop, too!  Got me a couple of those hair clips!)  Anyways...here is my hair story.  And a recent new addiction that I have fallen in love with!

I'll start with a confession.  I have no idea what my real hair color is anymore:).  It's true.  Not a clue.  


Second confession. Sometimes I yell at my frizzy, curly hair in the mirror.  When it doesn't do what I want.  Or decides to act snotty and ignore me altogether.  I may have even hit it with the brush once.  (That was a one time thing, as in hitting my hair I also hit myself in the head.)  Point is, I have a love-hate relationship with my hair.  But, I guess, don't we all:).  

Color is fun.  I've done everything from completely black to light brown with blonde highlights.  Even went through an orange phase...although that was unintentional.  (Frizz + Curls + Orange = CLOWN).  I love color. Love to change it with the seasons (I'm auburn right now:).  Love to just feel fresh.  It's what I do when I need a change. When I need some fun.  Or, sometimes, when I'm just plain bored!  


Styles are fun, too.  Like I said, my natural hair is curly and wavy.  Not in a uniform way. And it tends to be prone to frizz.  (My bowling name when I go with the Mr. is Frizzy Jynx;).  I've had it long, all the way down to my bottom.  And super, duper short.  Maybe an inch and a half off my scalp!  (And, yes, went from one extreme to the other in ONE haircut.)  I love to straighten it.  My most favorite way is to scrunch it all up and blow dry it out into a big poofy, curly mess.  Yeah, I feel most like myself with big hair.  (Maybe it's the Jersey girl in me:). 

This past year I gave synthetic dreads a try (*new hair addiction*).  I went and had my hair well, chopped (I say chopped because the girl butchered it)...and wanted to remedy it somehow.  Funny coincidence-- I was doing a piece of artwork for a girl on Etsy who sold dreadlocks.  I was instantly hooked-- so many pretty color combos to choose from.  So many types of dreads...lengths...styles...It was like my hair dreams coming true!:).  


I wore 4 different sets of dreads from April to August of this year.  I always order them really long, between 26-28"  and in a combination of single ended and double ended styles.  My sister braids them easily into my hair over the course of maybe two movie nights;), and they are in for good for the next 6-8 weeks.  (May need some tightening half way through.)  I love them.  They are not nearly as heavy as you'd think.  You can wash them!!  And yes, anyone can braid them in.  Literally.  I order my dreadlocks from Damnation Hair on Etsy.  Amanda is a sweetie, and every set has been 100% perfect!

After almost six months of wearing them, I needed a little break:).  I do miss them, though.  But that is part of the fun-- giving things a break, trying new looks, going back to old ones:).  Right now, I'm kind of obsessed with feather pieces.  And I'm ordering a set of plain hair extensions from Amanda soon.  Just gotta keep playing:)!!


I hope you had fun reading my hair story:)  LOL.  If you'd like to read more in-depth about wearing dreads, you can see my two part post here and here:).  If you do stop over, please say hello!  I'd love to meet ya!

♥ ♥ ♥ ♥ ♥ ♥ ♥ ♥


Be sure to stop by Krista's blog for lots of lovely things! She's absolutely gorgeous and she has a personality that definitely matches! So happy to have her as our featured sponsor this month! If you're interested in being the featured sponsor, feel free to email me! I am now booking January and February 2012! xo

PS: The winner of the Jensen Turntable giveaway is: Razzle Dazzle, and the winner of the September Group Giveaway is Rae Veda! Check your inbox, girls!

Friday, 19 August 2011

Bending Fashion Rules with LuLu*s

Hey y'all! I shared a guest post I did on the LuLu*s blog earlier this week and now I'm back to share the last 2 installments! Peep the outfits below and pop on over to the LuLu*s blog if you'd like to read the posts!


and the first one,


Hope you enjoy the posts! It was such a treat to work with such a rad brand. Definitely recommend them (duh!). I'm gonna go get ready for work and relax for a bit! Have a great Friday night, friends! Pop back by tomorrow for a fun giveaway from one of my fab sponsors! (And see if you won the shop credit to Betwixxt!)

Saturday, 9 July 2011

guest post at crafted love


happy weekend everyone!!!! i just wanted to drop in here and remind you all to check out my guest blog post over at crafted love. it's a cute and simple tutorial to make your own japanese string garden! so head on over!!!

Photobucket


Saturday, 11 June 2011

Featured Sponsor: Saturated Canary

This month's Featured Sponsor, Krista of Saturated Canary, has opted to do a guest post for all of us here on Little Chief Honeybee! Her take on summer style is fun and fabulous so please be sure to read through and comment below! There's a giveaway coming up from her shortly! Thanks so much, Krista! xo
------------------------------------------------------------------------------------

Hi, my name is Krista.  I am an artist.  I love to draw all types of pretty, sweet, and even creepy characters.  There was a time when I considered using my love of drawing people to pursue a degree in fashion.  I absolutely love the aspect of styling a character.  Giving a girl her own look.  Own fashion sense.  That is perhaps my favorite part of bringing a character to life.  I’m so inspired by fashion.  It tells a first glance story. That is part of the reason why I’m an *avid* and slightly *addicted* follower of Kaelah’s.  I love this blog!  How could you not?!  She has a great take on personal style, making no apologies for loving dresses, colorful hair, and lovely tattoos.  She is my kind of girl, for sure! :)  For my guest post, I want to give you my take on summer style in a particular shade.  The color white.  I love wearing white in the summer—it reminds me of the beach!  Hopefully, I can show you how to do two white-on-white combos that are pretty, fun, and totally wearable! :)
The pieces I used for the two outfits are:
  • a fitted white tee (Target)

  • white jeans (can’t remember; they are pretty old)

  • white a-line skirt (Victoria’s Secret)

  • statement belt (Target)

  • eternity scarf (UO)

  • wedges (pink, Modcloth; red, Jessica Simpson)

  • cute hair accessories (Target)


This is an outfit I wore recently to do my Friday errands.  I added little touches of color with my scarf and pink wedges. I love a knotted belt, so added a braided brown one.  Threw in a flower hair clip.  And TADA!  A crisp, cool summer outfit.  (And, I managed to keep it clean—which is pretty amazing with two little kids in tow;).    


The second style I chose is a bit more girly and perfect for a Fourth of July picnic!  I paired the same tee, knotted in front, with my favorite A-line skirt.  Used an old polka-dot belt for a punch of navy blue.  Added red, peep-toe wedges.  Finally, with a sprinkling of red and blue hair bows, this look is perfect if you like a girly, vintage, even pin-up twist, to your style! Wearing a pretty white skirt to a picnic might be a leap of faith (be careful with your burger drippings!), but you’ll look so fresh and chic.  It’s nice to see a girl dress up for an evening out, even if it’s just a backyard bbq!

I use to shy away from white.  Picked up the idea somewhere along the line that the color was less than flattering.  I don’t believe that’s true anymore.  Maybe it’s not perfect for every day of the year, but you should try to take advantage of white in the summer months!  Using it as a base color for an outfit leaves you free to add fun accessories, pops of bold color, and play with different textures and patterns.

Thanks for checking out my summer style advice ;)! And a special thanks to Kaelah for letting me chat a little here on her pretty, stylish blog!  I’m so inspired by her flare for color, great dresses, and fun accessories.  There is nothing like a girl who has great fashion sense; and it all starts with knowing what you like, having confidence in your personal style, and totally rocking it!  Have a lovely summer, honeybees! 

♥ ♥ ♥ ♥ ♥

Be sure to drop by her blog to say hello and check out her cute drawings! You've got a chance to win one coming up shortly! xo

Friday, 4 March 2011

Guest Post: Elle's Candle Tin DIY!


Hello I'm Elle and I run a blog named Elle.mnop. I am a web designer by day and a craft-a-holic by night! Being in the computer so much everyday its so relaxing to come home and actually create something tangible. Plus I feel like it makes me so much more creative!

One craft project I have always wanted to do is to create candles. After talking to a few of my friends, I realized its a lot harder and expensive than I had originally thought. Of course because I was so excited already though I had bought some great vintage tins to make the candles in. The tins are so fun and colorful though that I didn't want them to go to waste so I thought of a new idea. I ended up putting the candle inside of the tin and just changing the tin itself. Below is the how to and I hope you have fun!


The first step is of course to find some tins and candles to put inside of it. I ended up having to shave down one of my candles a lot to fit into the small tin. It wasn't too hard to do but caution because it did make a pretty big mess!

Really the only other step is to punch out the holes. First I tried to use a hammer and nail to do this but it ended up taking forever and was just not practical. So I brought in the big guns aka power tools! I used an electric screwdriver to put a screw through the tin and then came back and widened up the hole a bit with a nail by twisting it around inside. I spaced out my dots in rows but you could make them random or even do patterns like diamonds. It does get a bit time consuming but I watched tv while doing it so it wasn't bad at all!


I love candles and now after lighting them next to my altered book sculpture it was completely worth it and I love how they turned out! The light was reflected beautifully on everything around it and was especially fun to take some blurred lighting pictures with! I hope you enjoyed a little bit of craft time and now that I am sponsoring the lovely Little Chief Honeybee I hope to get to know you! So stop on by my blog or facebook page and say hello!


Huge thanks to Elle for keeping the blog company while I'm out and about! She's such a rad gal and I'm so glad I'm able to call her a friend! Her blog is full of awesome DIYs and flea market finds so be sure to swing by and check it out! You won't be disappointed! xo

Wednesday, 1 December 2010

Guest Post: Katrina's Quinoa Salad Recipe!


Hi everyone! I'm Katrina from The Demure Muse! Thanks so much for having me over here at Little Chief Honeybee.


I can usually be found blogging about my daily outfits or jewelry making but today I'm here to share with you one of my most recent kitchen experiments. I hope you try it out this holiday season because I think the colors are perfect for the winter festivities!

Quick disclaimer: This whole recipe was an experiment between myself, a meatetarian, and my friend who has newly converted to being a vegetarian. If you’re like me and have never heard of quinoa prior to this, it’s a pseudo-cereal that is extremely nutritious and is often considered a vegetable substitute due to its nutritional value instead of a grain.

Vegetarian Quinoa Salad - serves 4

What you’ll need:
1. 2 cups of quinoa
2. 4 cups of vegetable broth (or a mix of vegetable broth and water)
3. 1 ½ cups of cherry tomatoes
4. carton of fresh basil (add as desired)
5. small block of feta cheese (or as much/little as you’d like!)


First, we need to wash the quinoa. You may notice that the water that the quinoa is being washed in will have a bit of a “soapy” feel. I did two rinses before cooking the quinoa.


Much like preparing rice, place a pot on the stove at medium to high heat with the vegetable broth in it. Once the broth comes to a boil, add the quinoa and put a lid on it. Remember to stir the quinoa every few minutes so that it doesn’t stick to the bottom of the pot. You’ll know when the quiona is ready because all of the broth gets boiled into the grains.

While the quinoa cooks, you can prep the rest of the ingredients for the salad. The great thing about making this salad is the fact that there is relatively little “‘cooking” involved! From here, halve the cherry tomatoes and chop the fresh basil. We want the basil to be in relatively big pieces.


Cut the feta cheese into about ½ inch cubes and then mix all of the fresh ingredients together in a separate bowl.


By this time, your quinoa should be well on its way to being fully cooked. We were a little impatient when we made this first batch of salad and we mixed all the ingredients in with the quinoa while it was still extremely hot, which melted the feta cheese. Depending on how you like your salad, it might be better to let to let the quinoa cool down a bit before mixing everything together.
Due to my meatetarian needs, I added a side of chicken. (I know, I know. I’m not the most supportive friend in terms of helping a newly converted vegetarian. I have a habit of forcing myself to have a balanced meal in terms of carbohydrates, vegetables, and proteins) I couldn't bring myself to have only a salad for dinner which is why I added the meat. I also added a small bed of spinach to my quinoa salad.


I hope you enjoyed the recipe! :)

--------------------------------------------------

Big thanks to Katrina for her awesome recipe! I can't wait to try it! You can stop by Katrina's blog or shop if you'd like to learn more about her!

Guest Post: Influence Holiday WishList!

Hi everyone, it’s Steph from Influence. I’m a twenty-one year old student from the UK and I’ve been blogging for a few months now just for fun. My blogs got a little bit of everything and is full of things that inspire me. I’m so excited that the festive period has finally arrived!! I love everything about this time of year from pretty fairy lights, chilly weather, snow, steaming cups of Starbucks gingerbread lattes, Christmas tree’s, Ice skating, quality time with loved ones, cheery music, woolly jumpers and furry boots (just to name a few reasons!!) I thought it would be fun to share with you all my Christmas wish list, have you started thinking of your own yet?


(1. Some wesc headphones 2. Hugo Boss Orange perfume 3. Some new nine west black boots 4. Hair products 5. Lush Christmas box selection 6. New socks 7. Some spending money.)


Every year I like to donate money to a charity. This year I’m going to donate to WSPA a well known charity who help stop cruelty to animals all around the world such as bears, working horses, factory farming, stray dogs, whaling etc. I think it’s important we spread awareness about these issues and show our support. It’s also a nice feeling to know you’ve made a difference in some person or animals life.

Thanks for reading my Christmas wish list everybody and I hope you all have a very merry and happy Christmas!! Love Steph x

Tuesday, 30 November 2010

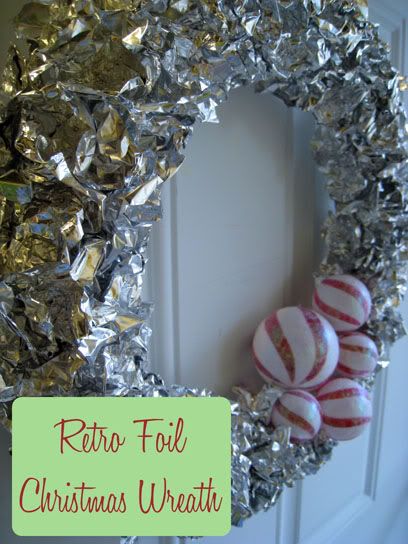
Guest Post: SusannahBean DIY Retro Foil Wreath!

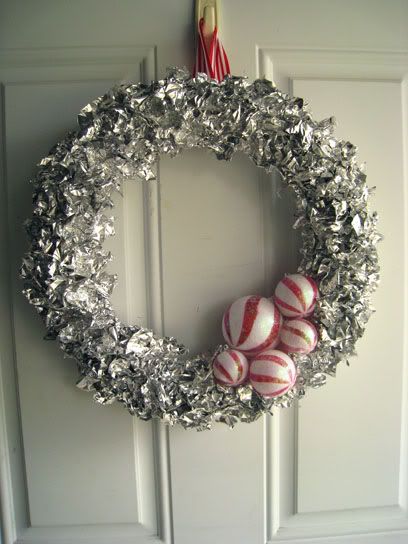
metallic diy wreath


I have a soft spot for cheesy Christmas decorations. I love tinsel and candy canes and elves, and if it looks like it came from the 1950s I’m all over it. That’s where the idea for this wreath came from. I wanted something with 50s style but a modern twist, and I wanted to reuse things I already had laying around my house. Thank you, Kaelah, for letting me share this with your readers!!


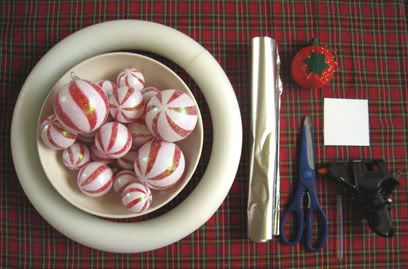
What you'll need:

  • One large (14”) Styrofoam wreath
  • One pack of ornaments (feel free to use any assortment of ornaments you have. It looks best if you have
  • different sizes)
  • One roll heavy duty tinfoil
  • Pins
  • Kitchen shears (or scissors, but they’ll need to be strong)
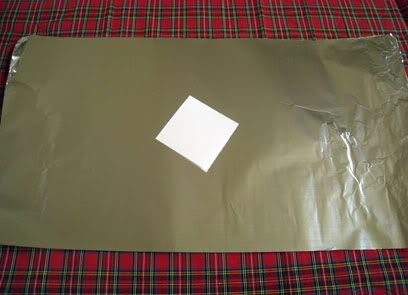
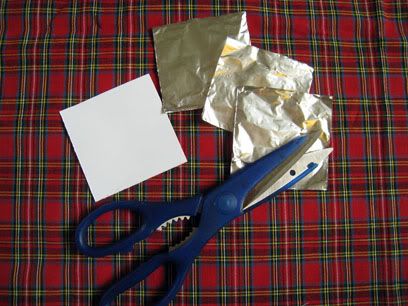
  • 3”x 3” square of cardstock (for a template, use any thick paper or cardboard)
  • Hot glue gun and glue sticks
  • (Optional): One 5-6” length of coordinating ribbon to use as a hanger, OR an over the door wreath hanger


Instructions:

Tear off a length of foil and fold it in half as many times as needed until you get a square pretty close in size to your template. It’s much quicker to cut the foil like this, that way you end up with a lot of squares!


You’ll want to separate the individual squares. Don’t worry if they tear a little bit, or if they aren’t perfect
squares. You’re just going to crumple them up anyway!

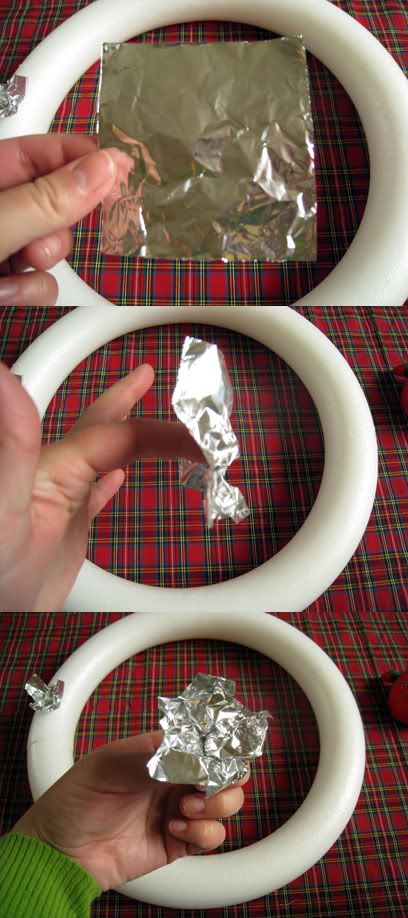
Take one square of tinfoil and wrap it loosely around the tip of your finger. Twist the center part of the square around and fold it back on itself. You need to make it thicker at the middle so it won’t rip when you pin it to your wreath, so as long as you can make a little thick spot you’re doing good!
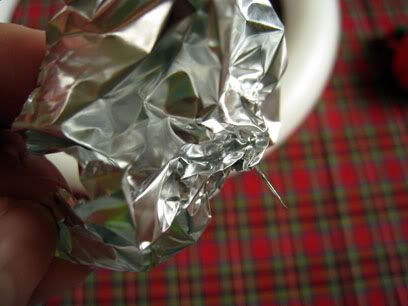
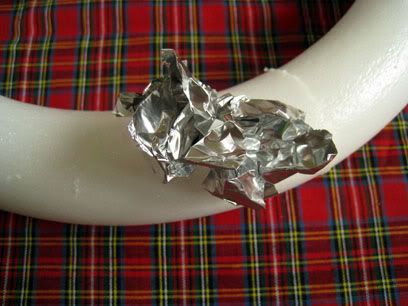


Insert a pin through the thick spot on your foil square.


Then insert the pin into your wreath. Crumple the foil a little, but not too much. Once you get going this won’t matter as much. You want to have each piece standing up as opposed to flattened out. Continue to pin down more foil squares, making sure you’re covering the Styrofoam so that no white shows through.
You don’t need to do the back half of your wreath because you want it to lay flat against your door, so just pin the foil to the top half of your wreath.


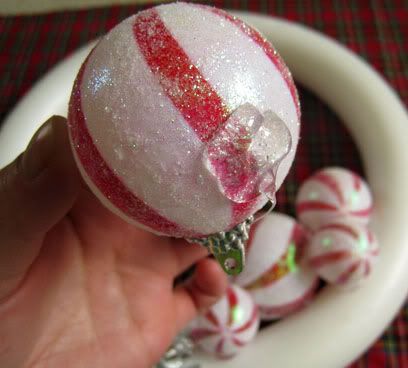
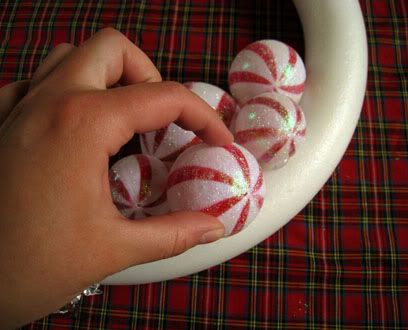
After you’ve done a little patch of foil leaves you’ll add your ornaments. Try out an arrangement before you glue it together. It helps to start with the biggest ornament and fill the little ones in around it. Once you’ve settled on an arrangement, glue them down with your hot glue gun. Use lots of glue, you want it to be secure!


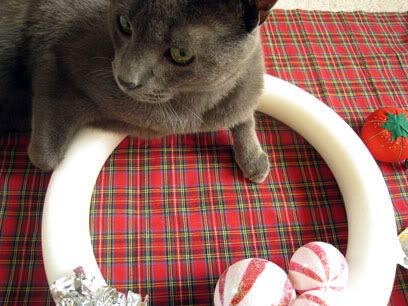
Get an assistant if you need to (my kitty Mr. Littlejeans tried to help, but it wasn’t working out, so I enlisted my boyfriend Chris!).


Keep cutting and folding the little squares and pinning them to your wreath. You’ll need quite a few to cover it, so just keep going until it’s completely covered!

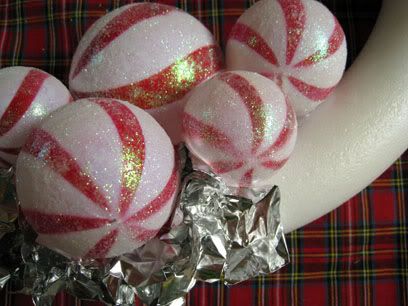
Crumple the foil in a way that will cover the white around your ornaments. If you’ve glued your ornaments close enough together, you should not need to pin any foil in between them.


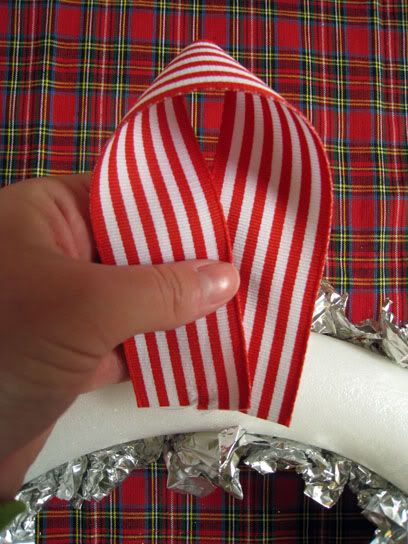
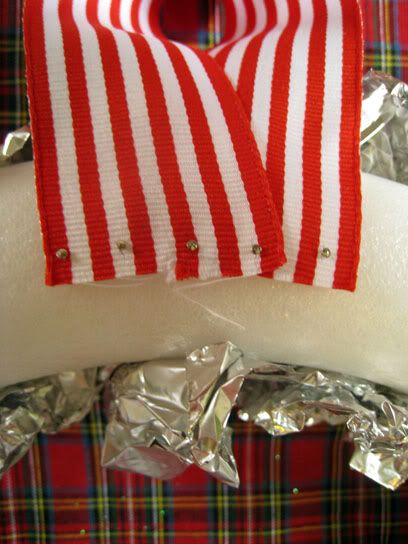
Once your wreath is covered in foil, you’re pretty much done! If you need to use a length of ribbon for your hanger, fold it as I’ve done in the picture below and pin it in place.


Hang your pretty retro wreath on your door and enjoy! All in all, I spent $9 on this little beauty, $5 for the wreath and $4 for the ornaments. It’s a cute way to add Christmas cheer to your house when you’re on a budget! If you make one of your own foil wreaths, I’d love to see it! Leave me a link to it on my blog at susannahbean.com so I can check it out! Happy Holidays!!

---------------------------------------------------

Be sure to drop by Susannah's blog and say hello! A huge thank you for the ultra rad and shiny holiday decor! I hope you're into DIY Week as much as I am! There's more where this is coming from! xo

Guest Post: LindsayHarmony DIY Felt Penguin Ornament!


Hello everyone! I just got my Christmas tree a couple of days ago, and I don’t know about you guys but I love handmade Christmas ornaments! They don’t have to be too complicated either, here’s a tutorial for an easy and fun penguin ornament made of felt and some fabric scraps.

Here’s what you’ll need:

felt and fabric penguin christmas ornament diy

Some felt in a few different colors (one main color for the body plus a few scraps for the beak and bow tie), some fabric scraps, buttons, some ribbon or rick-rack, a needle and thread, some glue, and optional polyester fiber-fill (or other stuffing material).


First, print and cut out the pattern pieces attached, then trace and cut out all your pieces. Part A will be cut from your main color of felt twice, this will be the front and back of the penguin. Part B will be cut from your fabric scraps, this will be the belly. And the bow tie and beak can be cut from other scraps of felt.


Next, you’re going to want to sew or glue the belly piece onto one of your pieces of felt. Line the bottoms of the pieces up. If you’re choosing to sew it on, you only need to sew the arch part, as the bottom will get sewed together later when you sew the back and front together.

felt and fabric penguin christmas ornament diy

Next come the eyes, you can again either sew or glue on the buttons. Then glue on the beak and bow tie. I prefer to glue these rather than sew because they’re so tiny. If you’re using tacky glue, don’t worry about getting any on the felt, it will dry clear!

felt and fabric penguin christmas ornament diy

Now you have the front of the penguin done! If you wanted to make this a no-sew project, you could easily glue on some ribbon to the top of the penguin and he’d be all ready to hang. But if you’d like to stuff the penguin, it’s time to stitch him all together! We’re going to stitch this front piece to the other piece of felt you’ve cut out. Lay the front piece on top of the back, and start to sew a running stitch all around the edges.

felt and fabric penguin christmas ornament diy

Once you get to the top, fold a piece of ribbon or rick-rack and lay it in between the front and back of the penguin. Sew over this to secure it.

felt and fabric penguin christmas ornament diy

Continue sewing all the way around, until you have about 2 inches left to sew. Stuff the penguin as little or as much as you’d like. I personally like mine a little plump =]

felt and fabric penguin christmas ornament diy

Finish off the stitching with a knot and you’re all done!

felt and fabric penguin christmas ornament diy

I love to make these little penguins in all kinds of color + fabric combinations. They make great gifts and look perfect on any tree!

Happy crafting!

-Lindsay

-------------------------------------------------------------

Be sure to stop by Lindsay's etsy shop to see her cute little pieces of felty-goodness! (The shark is my favorite! Followed close behind by the Sweet Autumn headband!) Thanks Lindsay! Stay tuned for a magical metallic foil wreath by SusannahBean coming up later today!