Showing posts with label Party Planning. Show all posts

Wednesday, 11 January 2012

A Wedding Reception, A Magical Evening: Welcome to the 176th Tablescape Thursday!

Recently, my friend Maree, who blogs at  Tales from an OC Cottageshared some wonderful photographs taken when her nephew, Joe (son of her sister, Bee) and his sweetie, Katie, were married back in November.  The wedding reception was held in the backyard of Maree's sister (Kae's) home.  Maree has posted pictures on her blog in past showing Kae's gorgeous gardens and landscaping, but I had no idea her back yard was so beautiful!  Add to that a stunningly beautiful wedding, and it must have been an evening not soon forgotten.

Maree said, "The bride (Katie) knew she wanted the cake in the gazebo...the basket ball court would be the dance floor and little white lights every where like in Stars Hallow {the little town where the Gilmore Girls lived.  We know it's not real, but we still want to live there one day!"


Maree said, "The grooms only request was the hanging paper lanterns.  He still has NO idea how we had to "MacGyver" them that morning.  The proper instructions were just TOO MUCH...we were already up to our eyes in glasses, napkins and tree branches! So I said we can just bend this to secure it...bend that to hang it...no lights had to be restrung, none fell, and they looked very cool."
I love the paper lanterns.  They immediately made me think of the paper lanterns hung for the party at Lauren and Harley's cottage home in the movie, It's Complicated,  HERE.  (Tour the main house in It's Complicated, HERE.)

I love the chairs they chose for the event.  The napkins are such a nice pop of color against the white tablecloths and china.  Lots of pretty stemware for happy toasts to the bride and groom.


If you've ever visited Maree's wonderful blog, you know she is the Queen of Glitter.   I designated that title just for her. :) Those skills came in very handy as she created the table numbers for this special dinner.  Maree told me the colors you see in the floral arrangements were chosen to coordinate with the color of the bride's shoes.  The napkins matched her shoes exactly.  I love that shade of pink...so vibrant and so pretty!  I know the bride was beautiful!


Peonies all the way from Holland!  Gorgeous!


In lieu of favors, the bride and groom made a donation to the Wounded Warriors Project.  Love that...such a a great idea!


Kae's daughter, Molly, along with her husband, were the photographers for this special day.  It's my understanding she photographs weddings all over the country.  If you would like more info about how to reach her, I'm sure Maree (Tales from an OC Cottage) will be happy to put you in touch.

This photo made me gasp...soooo beautiful!   Truly, truly a magical night!  Wish I could have been a fly on a lantern, watching it all down below.  Okay, maybe not a fly...how about a beautiful butterfly.  Yep, that's it.  A butterfly drinking in all the beauty below.


Maree, thanks so much for sharing these lovely pictures.  I want to come live in Kae's backyard!  Tell her I'll be there by tomorrow. ;)

Looking for more ideas for creating table numbers for a wedding reception or any occasion.  You'll find a tutorial HERE.

If it's ideas for table settings, click on the category,"Tablescapes" at the top of this blog and scroll down where you'll find picture links to posts with details images of table settings for all occasions, including bridal showers.

Looking forward to all the beautiful tables posted for this Tablescape Thursday!

To receive the latest posts, as well as updates about blog parties, subscribe via an RSS Reader or have BNOTP delivered right to your Inbox.  You'll find links to subscribe via RSS and e-mail on the sidebar to the right.  Thanks for reading; so glad you are here!

Reading this post via e-mail or RSS feed?
*If you are reading this via email or RSS feed, to view all the tablescapes linked for Tablescape Thursday, click HERE.

Please Read:
If you are participating in Tablescape Thursday, please be sure to add your permalink below, and not your general blog address. To get your permalink, click on your post name, then just copy and paste the address that shows up in the address bar, into the "url" box when you link up.

You'll need to include a link in your post back to the party in order to link up and participate.  That's so visitors to your blog will be able to find the party and  the other Tablescape Thursday participants.

If you would like to use the Tablescape Thursday logo button in your post, just copy and paste it to your computer and upload it to your post as you would any photo. Or, grab the html code you'll find under the "Parties" heading at the top of this blog.

Please, don't add your post name/blog name ALL IN CAPS...it tends to create big spaces between the rows of links. Thanks!

Let's try something fun today! Please visit the person who linked before you and after you...that way everyone will get some visits. Hope you'll visit more, of course.


Welcome! Thanks for coming to the party!

Sunday, 1 January 2012

Yummy Key Lime Pie Recipe: Welcome to the 154th Metamorphosis Monday!

If you're new to BNOTP, every Sunday evening (by 9:00 P.M.) our Metamorphosis Monday party begins. MM is a chance to share a "Before and After" you may have been working on this past week/month. Click on the category heading Parties at the top of this blog for more details.

I'm sharing an edible "Before and After" for this Metamorphosis Monday. This past Christmas I decided to shake things up a bit.  I made the traditional Coconut Cake and Ambrosia (recipe for Coconut Cake HERE) but I decided to make a pie, too.  Years ago, I used to make a Lemon Meringue pie using a recipe from  an old Eagle Brand Sweetened Condensed Milk recipe booklet.  I came across the recipe again recently and decided to give the Key Lime version a try.


The coconut cake took a lot more effort since I made it from scratch, including grating fresh coconut. When all was said and done, there was plenty of cake left and not a single piece of Key Lime pie.   Something tells me I've just started a new tradition for our Christmas feast.


Here's some of the ingredients you'll need to make this super easy pie.  I came across "Nellie & Joes Famous Key West Lime Juice" at Publix and had to try it because of the cute little houses on the label.  Yep, I'm very scientific about how I pick my ingredients.

You'll need:
1 (9 inch) baked pastry shell, cooled
4 eggs (to be separated)
1 (14 ounce) can of Eagle Brand Sweetened Condensed Milk
1/2 cup Lime juice
Green food coloring (optional)
1/2 teaspoon cream of tartar
1/3 cup sugar


One word of caution:  When I made this pie last week for Christmas, I used Borden's Eagle Brand Sweetened Condensed Milk and it came out perfect.  When I made the pie again for this post, I used the "store" brand sweetened condensed milk since it was on sale.  The pie came out a bit runny this time.  I'm sticking with Eagle Brand from here out...learned my lesson.


For my crust, I used one of these ready-made pie crusts.  The crust came out great.  I crimped the edge of the pie crust to create a pretty fluting around the edge when I made the pie last week.  The edge ended up hidden under the meringue, so this time around I didn't take time to create the pretty fluting.  Ummm, now that I think about it, I guess I should have left the crimped edge exposed.  Oh well, something to try next time.


Directions:
Preheat your oven to 350 degrees.  Separate all four egg whites and yolks.  Keep one egg white separated from the others.  It will be used in the filling.  The other three egg whites will be used to make the meringue.

How do you separate your egg whites?  I acquired this little egg separator at a Tupperware Party a gazillion years ago.  I can do the little "swapping it from egg shell to egg shell" trick, but this device makes it a bit easier.  Wonder if they sell something like this online?  I'm sure they do since Tupperware was making it so many years ago.  I bet William Sonoma has a high tech version.  Any of you awesome cooks know?

Tip:  Never separate egg whites over each other.  If a yolk breaks, you'll get yolk in with your other egg whites and will have to start all over.  Not fun...I speak from experience on that.


In a medium bowl, beat egg yolks.


Next, stir in your Eagle Brand sweetened condensed milk, lime juice and a touch of green food coloring.  The food coloring is optional but I think it adds a lot to the appearance of the pie.   I added just a smidgen to give it more of that "lime" coloring.


In a small bowl, stiffly beat the egg white you separated out from the other egg whites.  Then fold it into the sweetened condensed milk mixture.


Pour the mixture into your previously baked pie shell.


Beat the remaining three egg whites with the cream of tartar until they are foamy.  Then, gradually add the sugar, beating the egg whites into a meringue until they are stiff, but not dry.  Spread your meringue over the top of your pie, sealing to the edges of the shell.  I'm thinking now, I probably should have left the edges of the pastry shell exposed.  Ummm, will do that next time.

Bake your pie at 350 degrees for 15 minutes.  The meringue will begin to brown so you'll know it's getting close to being done.  Once it's done, just chill it in the frig.


When the pie was done, I took it out to the porch where the lighting is better so I could grab a quick pic. Can you tell it was a breezy day out on the porch? :)


This pie is so easy to make.  It would be a great dessert to serve for a spring or summertime party.  It looks huge in the picture doesn't it.  Must be the angle...it's normal size in real life. lol


The pie was a bit tricky to slice since the meringue was stuck down to my pie pan.  A food photographer, I'm not. HA!  I did discover after squishing a few slices, if you wish to cut pretty slices, smear a tiny bit of butter on your knife before cutting.  As I photographed the pie, I was thinking how great this would be poured into tiny, individual pasty shells for little mini Key Lime pies.  Ummm, may try that next time.

Love trying new recipes?  You'll find additional recipes HERE.  Just click and scroll past the picture links to table settings, party tips, napkin folds, etc... to the bottom of the page where you'll find more of my fave recipes for party food, desserts, appetizers, etc...  Or, click on the category header, Tablescapes and scroll to the bottom of that page.


Looking forward to all the Before and Afters!

RSS Reader or have BNOTP delivered right to your Inbox.  You'll find links to subscribe via RSS and Email on the sidebar to the right.  Thanks for reading; so glad you are here!

Reading this post via e-mail or RSS feed?
*If you are reading this via email or RSSHERE.


Metamorphosis Monday:
If you are participating in Metamorphosis Monday you will need to link up the "permalink" to your MM post and not your general blog address. To get your permalink, click on your post name, then just copy and paste the address that shows up in the address bar at the top of your blog, into the "url" box for InLinkz.

In order to link up, you'll need to include a link in your MM post back to the party.

If you'd like to include the MM button in your post, just copy and paste the Met Monday button to your computer or grab the html code from underneath the MM logo under the "BNOTP Parties" header at the top of this blog.

PLEASE DO NOT type in all caps...it spreads the links waaaay out. Thanks!

Let's try something fun today! Please visit the person who linked before you and after you...that way everyone will get some visits. Hope you'll visit more, of course.


Welcome! Thanks for coming to the party!

Thursday, 29 December 2011

New Year's Eve Champagne Punch, Delicious and Easy to Make

While we continue enjoying all the beautiful tablescapes linked for this week's Tablescape Thursday, I thought I'd share a wonderful recipe for a Champagne Punch I make every Christmas and New Year's.  It's easy to make and always a big hit.  (If you don't care for champagne, substitute chilled club soda, instead.)


If you are making this for a small gathering of 2-4 people, one batch will do. If you're having a larger gathering, you'll want to make several batches because it's always a big hit and goes quickly. I went through 4 batches (with none left over) when I had a party with 25 in attendance. (So, that works out to be around 1 batch for every 6 folks in attendance.)


Champagne Holiday Punch

Ingredients:
1 cup water
1/2 cup sugar
3 cinnamon sticks
4 whole cloves
2 cups cranberry juice
1/2 cup pineapple juice
1 bottle champagne (Korbel Brut works great)
Small amount of Grand Marnier (or any orange liqueur you prefer)
Red sugar
Green sugar

In a saucepan, bring water, sugar, cinnamon sticks and cloves to boil.
Reduce heat and simmer for 5 minutes.
Discard cinnamon and cloves.
Cool to room temperature and pour into a large pitcher.
Add cranberry juice and pineapple juice.
Chill in fridge until ready to serve.
At serving time, add 1 bottle of chilled champagne.

Right click on pic below to save it to your computer, then just print it off...much easier than having to write it all out.


Dip the Rims in Nonpariels for a Festive Occasion:

For a New Year's Eve party or a birthday party, I like to dip the rims of the glasses in nonpareils, instead of the the colored sugars I use at Christmastime, seen HERE.


When you are ready to serve this punch, just pour a little Grand Marnier or any orange liqueur into a shallow dish. Pour some nonpareils into a bowl.


Dip the rim of the champagne glass into the Grand Marnier, then into the bowl of nonpareils. Then pour the punch into the glass.


You can serve the punch from a punch bowl and ladle it into the glass, but since the opening of a champagne glass is so small, it can be pretty messy with the punch ending up running down the sides of the glass. I found it much easier to just pour it from a pitcher.


Or, if you have a beverage server similar to the one below, that will work well, too.


You may wish to print off some copies of this recipe because your guests are going to be asking for it.  Or, just tell them it's an old family recipe and you've been sworn to secrecy. ;)


To see the Christmas version with sugared rims, click HERE.  It's really pretty with green and red sugared rims for Christmas.

Tuesday, 29 November 2011

Help! It's Holiday Party Time!

I love this time of year. It's crazy busy but oh, so much fun! With Thanksgiving behind us, it's time to focus on getting ready for Christmas and the upcoming holidays. Do you have an office party coming up? Any neighborhood parties to attend? Or, perhaps you'll be the one hosting this year's holiday gathering.

Photo from O Magazine online

Remember this awkward "social" visit in the hysterical movie, The Burbs?   I've often wished there was someone to turn to for the "how tos" and "what ifs" of holiday entertaining. Wouldn't it be wonderful to have someone knowledgeable in the field of etiquette to bounce all those questions off we have about hosting and attending holiday parties?

Scene from movie tour, The Burbs

Well, wish no more because BNOTP is fortunate to have a Sponsor who is an expert in the field of etiquette.  Cindy Haygood, the Training Director with the Etiquette & Leadership Institute is visiting today and she's helping us out with questions we sometimes have about hosting or attending dinner parties and holiday events.


The Etiquette & Leadership Institute teaches/coaches anyone who would like to be come more comfortable with the etiquette expected in both business and social situations.  They also train those who would like to start their own cottage or home business, training children, young adults and others who would like to increase their confidence level in the areas of etiquette.

Remember this extravagant Christmas party in the movie-home tour of Midnight in the Garden of Good and Evil?  What a party!  This Christmas party had it all: gossip, scandal, eccentric characters, including gun-waving guests!   Then there was that little matter of murder, afterwards.  Yep, I think this is one party where the guests could definitely have benefited from a little etiquette training. ;)


Cindy, could you share some information about the classes you offer?  So, exactly what does the Etiquette & Leadership Institute® do?
We are the nation’s training company that certifies and prepares etiquette consultants to teach ages 8 – 24. The week of training is dynamic, fun-filled, to motivate and inspire the next generation of etiquette ambassadors in their communities. We teach social, leadership skills along with social dance in our own community so when people come to our training we share with them exactly what we do in our career.


Open Houses are popular events during the holiday season.  What are some some tips for hosting a successful Open House.
Send your invitations out about 4 weeks in advance. This time of year is full of office parties, neighborhood parties, book club parties, family gatherings, holiday symphony concerts, etc. If you want an event on your friends’ calendars, give them plenty of notice!

Always have a greeter at the door (or have different greeters covering shifts!). It does not have to be the owners of the home. Pick someone who is great at greeting and hospitality and ask them to help you with manning the door.

Think DIY for the guests. Because people are always coming and going at an Open House, the host cannot be constantly fixing food and drink. Assign duties to eager friends, and give yourself the freedom to meet and greet and introduce your guests.

An Open House means welcoming a lot of people into your home. Use music in the background as a “supporting cast”—and not so loud that people cannot converse.


What are the three most common mistakes hosts tend to make when hosting a party?
One mistake is serving food that your guests cannot eat! If you are planning a menu, ask your guests about any food allergies or special diets (including vegetarian or vegan). A great way to ask is to simply say, “Are there any foods you are not able to eat?” Once you get the conversation going, you will feel more comfortable about your menu.

Another mistake is to over complicate the event with never-before-tried dishes…a sure ingredient for disaster. Instead of being ambitious, think simple and streamlined for success. Stay within your comfort zone and enjoy your guests.

A third mistake is a lack of organization. Do all you can before the event—lay out all of your serving utensils, for example. In the past, I have forgotten to take something completely prepared out of the refrigerator! So now I make small labels of all of my menu items and place them on the sideboard. No one knows that they are there because the dish goes over the label, and I haven’t forgotten anything. Being organized and creating a timeline of the evening works wonders for your peace of mind and enjoyment!


What are the three most common mistakes guests make when they are invited or attend a party?
One very common error is a complete lack of correspondence after receiving an invitation. Guests should RSVP to let the host know whether they are coming. Some invitations say RSVP and others say Regrets Only, and there is a difference.  If your invitation says RSVP, you should call, give your name, and say whether you are attending or if you are not attending—you must let the host/hostess know either way.
If your invitation says Regrets Only, call only if you cannot attend. If you can attend the event, you do not need to call, but you certainly do need to be present!

A second mistake is being late. There is perhaps nothing ruder than showing up late for an event that involves food and beverages and has a set beginning time. Whatever the reason is, please call and let your host/hostess know if you are running late and give your host the freedom to go on with dinner without your presence. Arriving late just because you couldn’t get your schedule together shows that you don’t have respect for the other person’s time.


When invited to a party, when is it appropriate to bring a hostess gift?
Being an overnight house guest always calls for a hostess/host gift. You may bring a host/hostess gift to a dinner party, though it is not required. Bringing such a gift is a way to say “thank you,” and to share a small item you enjoy with a friend.

If the party is given to honor or announce an event or person(s), then you would not bring a hostess gift. But, writing a thank-you note after the event to the hosts/hostesses is always appropriate.


What items are appropriate for giving as a host/hostess gift?
Some ideas of hostess gifts are: a bottle of wine you love, a favorite printed quote on quality paper, a home baked goodie for later enjoyment, or an item for which your area of the world is known. One item I keep to give is a small round tin of tea that holds five sachets. It is a very small item, but it is something I love, so I like to share it with others.

Keep in mind the cultural, religious and personal backgrounds of the persons to whom you are gifting. In other words, I love to give peanuts and pecans because they are Georgia products, but I always find a way in conversation to determine whether anyone in the household is allergic to these items.


I know the Etiquette & Leadership Institute offers classes for children and young adults, as well as those wishing to start their own business in etiquette training, but do you also offer classes for adults who feel they could use a refresher in this area?
Yes, certainly! Many times, adults find themselves needing the polish to move up the corporate ladder and they want to distinguish themselves from the competition. One sure way is to be confident in dining and in social situations. We also offer classes for those that need to be comfortable with dancing at formal occasions. For us, teaching and helping people get ready for important moments in their life is fun and gratifying for us.


Cindy, thanks so much for sharing all this great information.  I'll definitely be bookmarking this post for future reference since it will be a favorite to reread this time each year, or anytime I need a reminder before hosting or attending  a party or social event.

For more information about available courses at the Etiquette & Leadership Institute, you may visit their online site by clicking the button below.

Etiquette & Leadership Institute


Are you hosting a party this year in your home?  Will you be attending a Christmas or holiday party?  Any challenges or concerns?  Leave a comment and tell us all about it.   Together we can figure it out!

Saturday, 17 September 2011

Tutorial: Carved Watermelon Party Centerpiece

Survey:
Wow, I have learned sooo much about what you enjoy reading/viewing when you visit BNOTP. Thanks so much to the 400+ readers who have already completed the short 9 question survey I posted HERE.   And thank you from the bottom of my heart for the unbelievably generous comments you've shared. I found myself almost in tears at times while reading your comments.  Please know how much I appreciate your responses and that you took time to share your preferences with me.  If you haven't yet taken the brief survey, there is still time.  I'll leave it open through Monday evening.  Thanks again for your input!


Carved Watermelon Party Centerpiece:
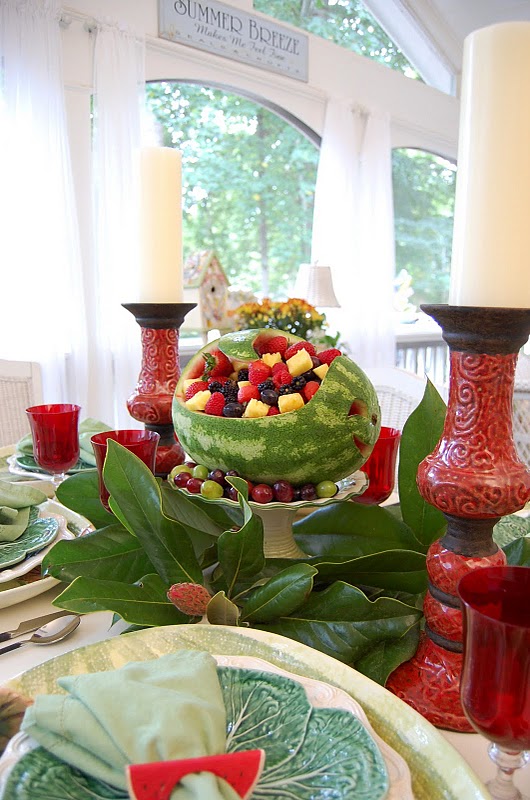
This past Tablescape Thursday, I shared a table setting with a carved watermelon centerpiece.


For a party many years ago, I cut the top off a watermelon and hollowed it out to hold fruit.   That was cute, but I've always wanted to try my hand at carving one into a fun shape.


The cookbook below provided the inspiration I needed for this centerpiece.  I've had this cookbook for many, many years and I've always admired the carved watermelon on the front.  I've carved designs in pumpkins as shown in THIS post where I managed a reenactment of the burglars sliding on the ice-covered stairs in the movie, Home Alone. ;)


Pumpkins can be a bit hard to carve unless you have special carving tools (also shared in that post.)  I'm happy to report, carving a watermelon is nothing at all like carving a pumpkin.  Watermelons are much softer and much easier to carve out than pumpkins.


The cookbook above provided this template for tracing out Mr. Whale's tail.  You should be able to save it to your computer by right clicking on the pic and choosing save.  Then just enlarge or decrease it to the size that's appropriate for your watermelon.


Here's how my template looked once I printed and cut it out.


I purchased a small watermelon for my first carving attempt.  If you're having a really large gathering, you may wish to buy a larger melon.  This small one held a LOT of fruit, though...I was really surprised.

Place your melon on a flat surface.  The stem is going to be the nose of your whale when you're done, so position your tail template on the opposite end of the whale, but with the tail pointing back toward the stem end.  When you're done, it's going to look like Mr. Whale has flipped his tail up into the air and pointed it back toward his head/face.

I didn't use pins to hold the template in place...just held it with my hand as I traced around it.  Trace the tail shape/design using a pen, crayon or whatever you have handy.


Once I had the tail traced on the top of the melon, I continued the line out, down and around the side of the pumpkin, then upward on the front to create the rise for the face/head.  (Refer back to the pictures above of the completed whale to get the general idea of where to draw your lines on the sides and for the face.)

I used a crayon to draw this design and I made adjustments along the way, just wiping off the crayon marks where I didn't want them.   If you like, go ahead and free-hand on the eyes and smile at this point.  There wasn't a template for the eyes or for the mouth in the book, but they are easy to draw on your melon.


The directions recommend you cut an X like this into the top section of the pumpkin between the tail and the head to relieve the pressure inside the pumpkin.


Once you have your design on your melon, take a pumpkin cutting tool or just a small paring knife and began cutting around one side of the tail.  Don't rush, just take your time.  You can see the pumpkin cutting tool/knife I used below to get started.  A small, sharp knife would work great too because melons are just so much easier to cut than pumpkins.  In this view below, you can see the shape of the head as it rises upward on the front of the melon.  I hadn't yet drawn on the eyes or mouth.


Next, I just began cutting out sections of the middle part that I knew would need to be removed.  I was careful to avoid cutting into the tail, head or side.


You can cut the part you're removing out in small chunks or bigger pieces...whatever you feel comfortable doing.


Making progress...


With most of the middle removed, it was time to start scooping out the inside.  I also trimmed down the "meat" side of the tail section until it was about an inch or so thick.  I hadn't done that when this photo was taken.  Be super careful when you're trimming away melon from the underside of  the tail.  Support the tail with your other hand and take it slowly so you don't slice too deep or take off too much.


Of course, you'll want to save the melon you scoop/cut out to make melon balls or to cut up into small pieces to put back into your melon once it's ready to be filled.  Once I got Mr. Whale all scooped out, I traced on some eyes and a smiling mouth on to the front, then cut those out.

An Idea:  The mouth was the hardest section to cut because I couldn't tilt the melon back...too afraid I'd break off the tail.  Once you have your outline drawn on your whale...along with the face, it might be better to cut the mouth out then, before cutting the rest of the melon.  That way, you could tilt it to cut.  It's a bit tricky to cut the mouth once the rest of the melon is cut out.


Here's how Mr. Whale looked once carved.  You can see the underside of the tail looks thinner in this pic.  I had cut away more of the pumpkin by this point.  See how the stem is now his nose. :)
TIP:  It's okay to cut all the way through when you cut out the eyes of your whale, but when cutting the mouth, only cut a little ways into the pumpkin, not all the way through.  I know it's hard to see in this pic, but I didn't cut all the way through, like I did with the eyes.  The reason for this is...it keeps the juice of the fruit from leaking out onto your table once you fill Mr. Whale.


A view from above...


The directions in the cook book suggests poking a hole into the top of your whale's head and poking in some dried white flowers so it will look like Mr. Whale is spraying water up into the air.   I love that idea.  I didn't have any whitish flowers to use or I definitely would have done that.  You can see how it would look on the cover of the book below.


Fill Mr. Whale with your favorite fruits...


And enjoy the ooohs and ahhhs of your party guests. :)


I Googled watermelon and found the National Watermelon Promotion Board.  They have directions for carving so many awesome designs.  Here are just few from their site:


Ha!  A porcupine!  This melon has the same basic face shape of our whale.  Love the ragged edge around the face...those small details add so much.  This design actually looks pretty easy to replicate.


Licorice makes a cute mouth and whiskers for Mr. Kitty.  Notice how they only cut as deep as the white part of the melon to outline the kitties face.  The white of the melon makes a great outlining for features.  Love the melon ball eyes.  They even included a ball of yarn and a collar for kitty. :) Cute!


Wouldn't this be a fun centerpiece for a beach house party?  All the directions for these designs are available at the site linked above in this post.  I'll definitely be trying my hand at some of these fun designs next summer.


See you Sunday evening for Metamorphosis Monday!

Templates for pumpkin carving can be found HERE.